State Admin Journey
Introduction
The State Admin is responsible for managing the entire RTE-MIS system lifecycle — from initial setup to admission cycle completion and monitoring.
This journey explains how the State Admin uses each module step-by-step.
1. Login to the System
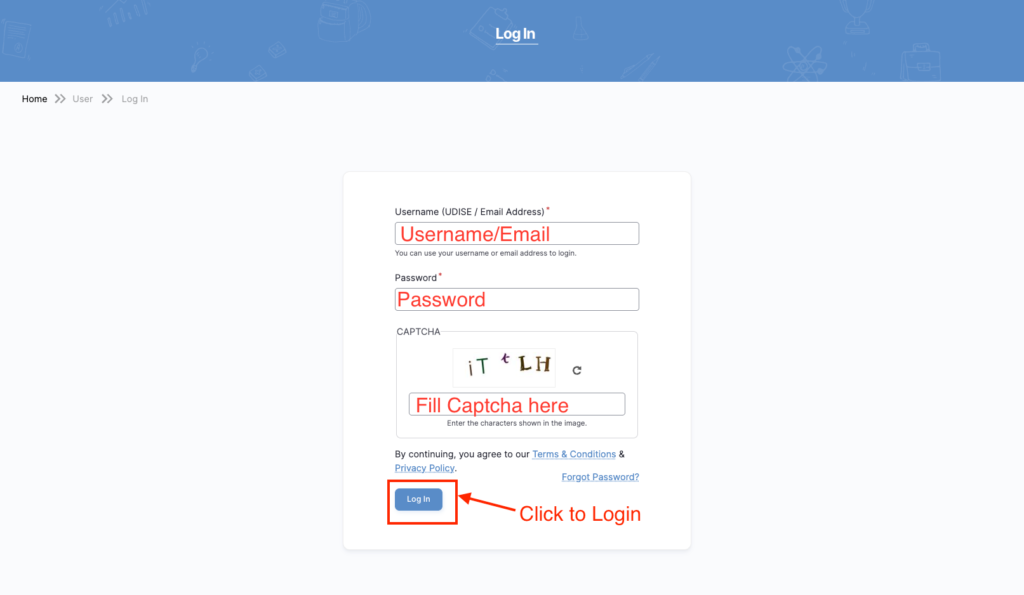
Steps:
- Enter Username / Email
- Enter Password
- Fill Captcha
- Click Login
📌 Field Explanation:
- Username/Email → Enter registered login ID
- Password → Enter your password
- Captcha → Enter characters shown in image
- Login Button → Click to access dashboard
🎯 Important:
✔ All fields are mandatory
✔ Incorrect captcha will block login
✔ Use “Forgot Password” if needed
Step 2: Dashboard Overview
🖥️ State Dashboard
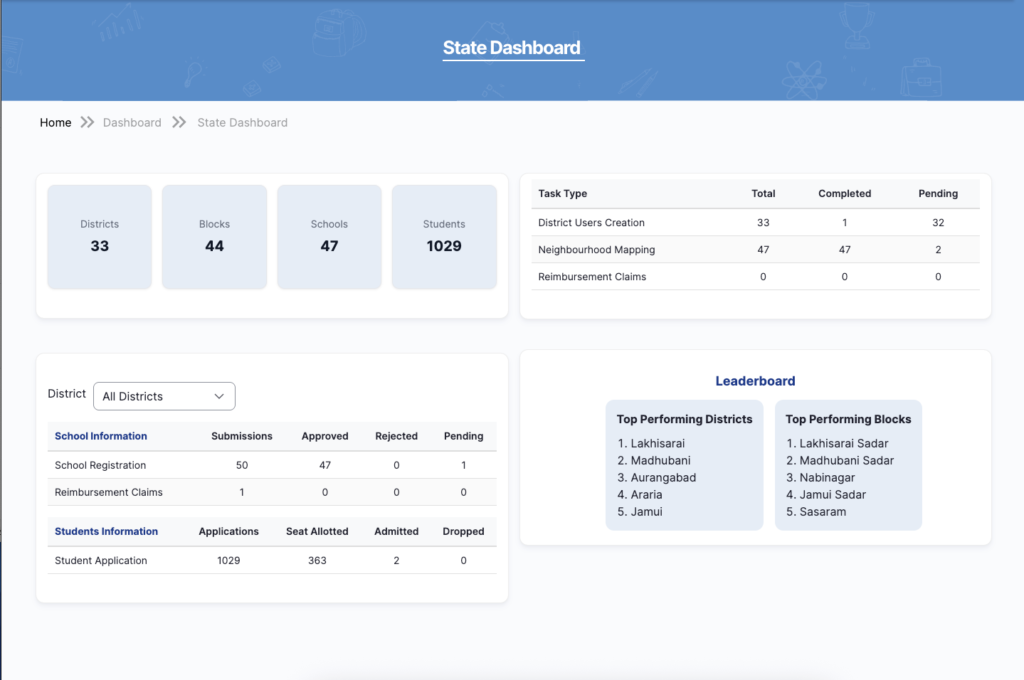
📌 Purpose of Dashboard
The State Dashboard provides a centralized overview of:
- System performance
- Admission progress
- Administrative activities
It helps the State Admin quickly understand the current status of the entire system.
🔍 Key Sections Explained
1️⃣ Summary Cards (Top Section)
- Districts: Total number of districts onboarded
- Blocks: Total blocks under districts
- Schools: Registered schools in the system
- Students: Total student applications
👉 Helps in quick high-level tracking.
2️⃣ Task Monitoring Panel (Right Side)
Displays progress of key activities:
- District Users Creation
- Neighbourhood Mapping
- Reimbursement Claims
Each shows:
- Total
- Completed
- Pending
👉 Useful for identifying delays and pending work.
3️⃣ District Filter Section
- Dropdown: All Districts
- Allows filtering dashboard data by selected district
👉 Helps in district-level monitoring.
4️⃣ School Information Summary
Shows:
- School Registrations (Submitted / Approved / Rejected / Pending)
- Reimbursement Claims
👉 Helps track school onboarding and financial activities.
5️⃣ Student Information Summary
Displays:
- Total Applications
- Seats Allotted
- Admitted Students
- Dropped Cases
👉 Helps monitor admission lifecycle.
6️⃣ Leaderboard Section
- Top Performing Districts
- Top Performing Blocks
👉 Based on performance metrics like:
- Approvals
- Mapping completion
- Admissions
🎯 Outcome of This Step
✔ State Admin gets complete system visibility
✔ Can identify pending tasks and bottlenecks
✔ Helps in data-driven decisions
Add Users (Complete Flow)
1. Add District User / Block User
🔹 Step 1: Navigate to Users
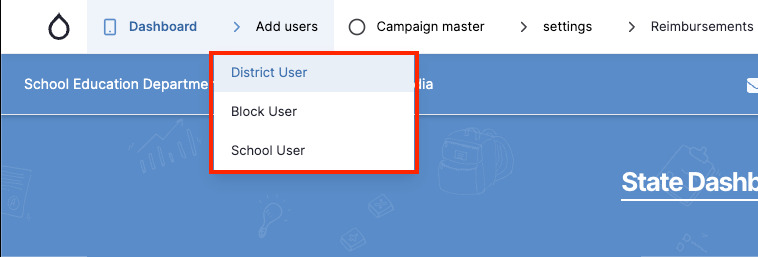
🧭 Action:
- Go to Add Users
- Select:
- District User / Block User
📋 Step 2: View Users List
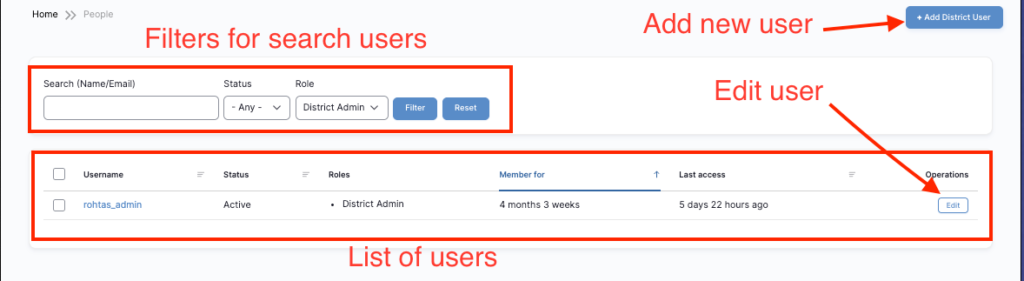
🔍 Features:
- Search (Name / Email)
- Filter (Status, Role)
- Edit button for each user
🎯 Outcome:
✔ View all users
✔ Select user for editing
✏️ Step 3: Edit User Details
🧭 Action:
- Click Edit button from user list
- Edit required fields
- Save changes
Editable Fields Explained
📍 Location Details
- District
- Block (for Block User)
👤 Admin Details
- Designation
📱 Contact Details
- Mobile Number
- Email Address
👤 Username
- Auto-generated / editable (based on permission)
🔐 Password Section
- Update password (optional)
- Confirm password
👉 Rules:
- Minimum 6 characters
- At least 1 letter, 1 number, 1 special character
⚙️ Status
- Active → User can login
- Blocked → User access disabled
👔 Role
- District Admin (Auto filled/ Disabled)
🏦 Bank Details
- Bank Name
- Branch
- IFSC Code
- Account Holder Name
- Account Number
👉 Used for reimbursement processing
✅ Final Step
- Click Save / Update
🎯 Outcome:
✔ User details updated successfully
✔ Changes reflected in system immediately
🔄 Complete Flow
Add Users → View List → Edit User → Update Details → Save
💡 Important Notes
👉 Use Edit when:
- User details are incorrect
- Contact info needs update
- Role needs change
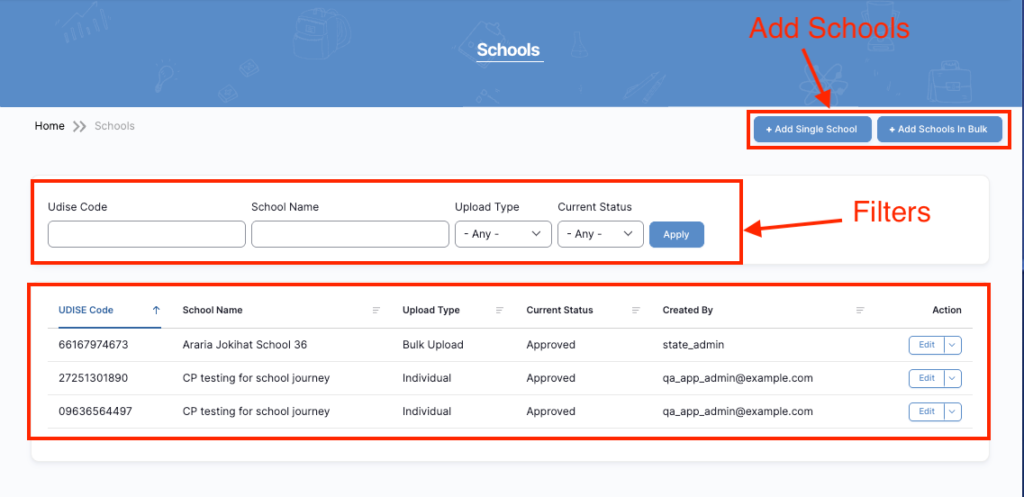
2. Add School User
Step:
- Go to Add Users → School User
- System opens School Users List page
What You See:
- List of all schools
- Filter/search section
- Add school buttons
🔍 Key Features:
🔹 1. Filter Section
- UDISE Code
- School Name
- Upload Type (Bulk / Individual)
- Current Status
👉 Click Apply to filter results
🔹 2. Schools Table
Columns:
- UDISE Code
- School Name
- Upload Type
- Current Status
- Created By
- Actions (Edit)
🔹 3. Actions
- Edit Button → Update school details
- Filter Button → Apply search
- Reset (if available) → Clear filters
🎯 Purpose:
✔ View all schools
✔ Track approval status
✔ Manage school records
Bulk Upload Schools
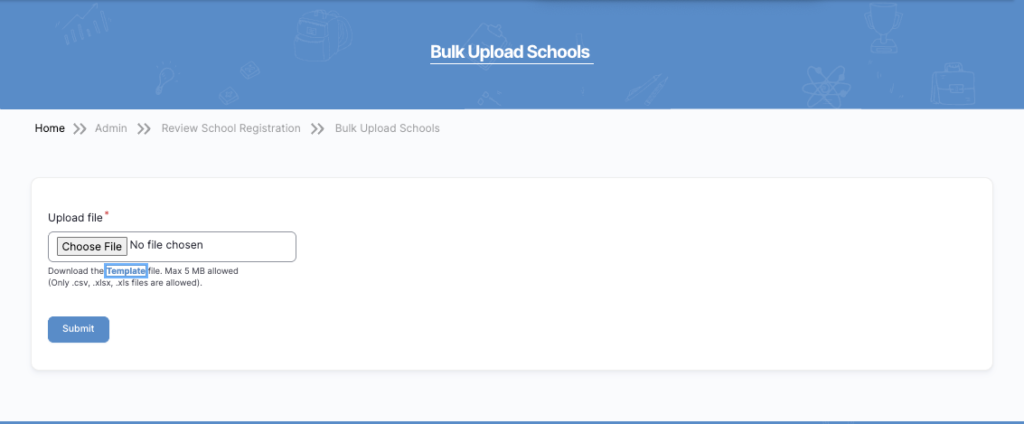
🧭 Step:
- Click + Add Schools in Bulk
- Download Template File
- Fill Excel file
- Upload file
- Click Submit
📌 File Rules:
- Supported formats: .csv, .xls, .xlsx
- Max size: 5MB
🔴 Highlight:
- 🔴 Download Template → Get format file
- 🔴 Choose File → Upload data
- 🔴 Submit Button → Process upload
📊 5.4 Excel Template Structure
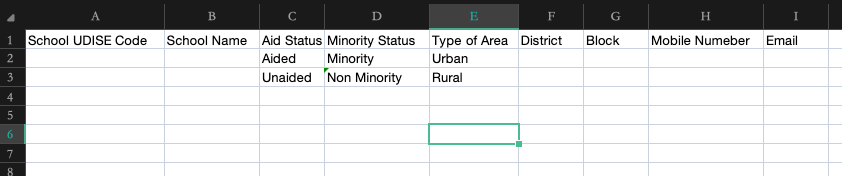
📌 Required Columns:
- School UDISE Code
- School Name
- Aid Status
- Minority Status
- Type of Area
- District
- Block
- Mobile Number
🎯 Important:
✔ Do not change column names
✔ Follow exact format
✔ Incorrect data will fail upload
📌 Important Rule:
👉 After adding school:
- School must complete self-registration in the portal
3: Campaign Master (Data & Setup)
Overall Flow
Campaign Master →
1. Location Mapping →
2. School Mapping →
3. Student Mapping →
(Then Lottery & Admission Process)
📍 STEP 1: Location Mapping (Foundation)
Flow
Campaign Master → Location Mapping →
1. Bulk Upload Locations (Upload Link)
2. Location Index (Hierarchy View)
📤 1. Bulk Upload Locations (Upload Link)
Navigation
Campaign Master → Location Mapping → Bulk Upload Locations
📋 Purpose
Upload multiple locations (District → Block → Panchayat → Ward) in one go.
🪜 Step-by-Step
1️⃣ Click on Bulk Upload Locations
- Opens upload screen
2️⃣ Download Template
- Click Template file link
- Use only this format
3️⃣ Prepare Excel File
Include:
| District | Block | Urban/Rural | Panchayat/Nikay | Ward | Habitation |
4️⃣ Upload File
- Click Choose File
- Select Excel file
5️⃣ Click Save
- System validates
- Upload completes
📌 File Rules
- Max Size: 5 MB
- Formats:
- .csv
- .xls
- .xlsx
⚠️ Validation Rules
✔ Column names must match template
✔ No missing hierarchy levels
✔ No duplicate entries
✔ District & Block must be valid
✅ Output
- Locations created automatically
- Visible in Location Index
🌳 2. Location Index
📍 Navigation
Campaign Master → Location Mapping → Location Index (CRUD)
📋 Purpose
View and manage all locations in a hierarchical structure.
🌲 Structure
District
└── Block
└── Gram Panchayat / Urban Body
└── Ward / Habitation

📊 Columns
| Column | Description |
| Name | Location Name |
| Status | Published |
| Operations | Edit |
⚙️ Features
🔹 Expand / Collapse
- View nested structure
🔹 Drag & Drop
- Rearrange hierarchy
🔹 Edit
- Update location details
🧠 Example (From Your Data)
Araria
└── Jokihat
└── Jokihat Gram Panchayat
└── Ward 2
🔗 Connection Between Both
| Bulk Upload | Location Index |
| Upload data | Displays structure |
| Faster setup | Visual validation |
| Excel-based | UI-based management |
Best Practices
✔ Always upload clean, validated Excel
✔ Follow hierarchy order strictly
✔ Verify in Location Index after upload
✔ Avoid manual errors by using template
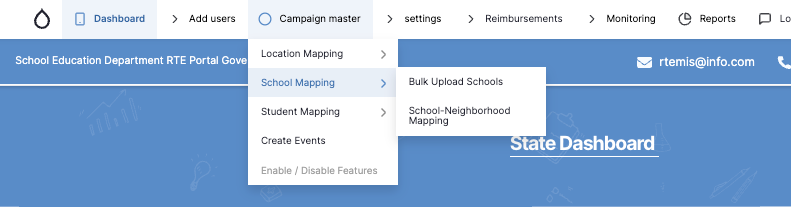
School Mapping – Step-by-Step Guide
🔄 Flow
Campaign Master → School Mapping →
1. Bulk Upload Schools
2. School-Neighborhood Mapping

📤 1. Bulk Upload Schools
📍 Navigation
Campaign Master → School Mapping → Bulk Upload Schools
📋 Purpose
Upload multiple schools at once using Excel template.
Steps
1️⃣ Click Bulk Upload Schools
2️⃣ Download Template
Typical fields:
| UDISE Code | School Name | Aid Status | Minority Status | Area Type | District | Block | Mobile | Email |
3️⃣ Fill Data
✔ Use correct UDISE code
✔ Match district/block with Location Mapping
✔ Avoid duplicates
4️⃣ Upload File
- Click Choose File
- Upload .csv / .xls / .xlsx
5️⃣ Submit
- System validates and uploads schools
⚠️ Validation Rules
✔ Unique UDISE Code
✔ Valid district & block
✔ Required fields must not be empty
✅ Output
- Schools added to system
- Visible in School Listing
📋 2. School–Neighborhood Mapping
📍 Navigation
Campaign Master → School Mapping → School-Neighborhood Mapping
📋 Purpose
Link schools with nearby areas (habitations/wards).
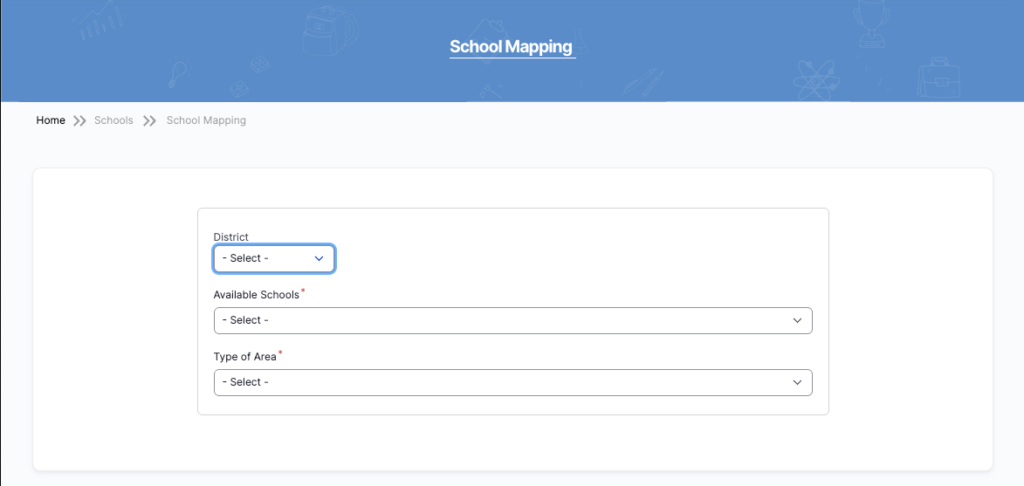
Steps
1️⃣ Select District & Block
2️⃣ Select School
3️⃣ Choose Area (Panchayat / Ward)
4️⃣ Move Habitations:
- ➡️ Add
- ⬅️ Remove
✅ Output
- School becomes available for students in selected areas
🔗 Full Relationship
Location Mapping → Defines Area
↓
School Upload → Adds Schools
↓
School Mapping → Assigns School to Area Type
↓
School-Neighborhood Mapping → Links School to Habitations
🚀 Best Practices
✔ Always complete Location Mapping first
✔ Use Bulk Upload for speed
✔ Verify schools before mapping
✔ Map neighborhoods carefully (affects student eligibility)
💡 Final Understanding
👉 Bulk Upload = Add schools
👉 School Mapping = Assign to district/type
👉 Neighborhood Mapping = Define reach
Language Change (Settings)
📍 Where to go
Settings → Set Language
🖥️ What this page does
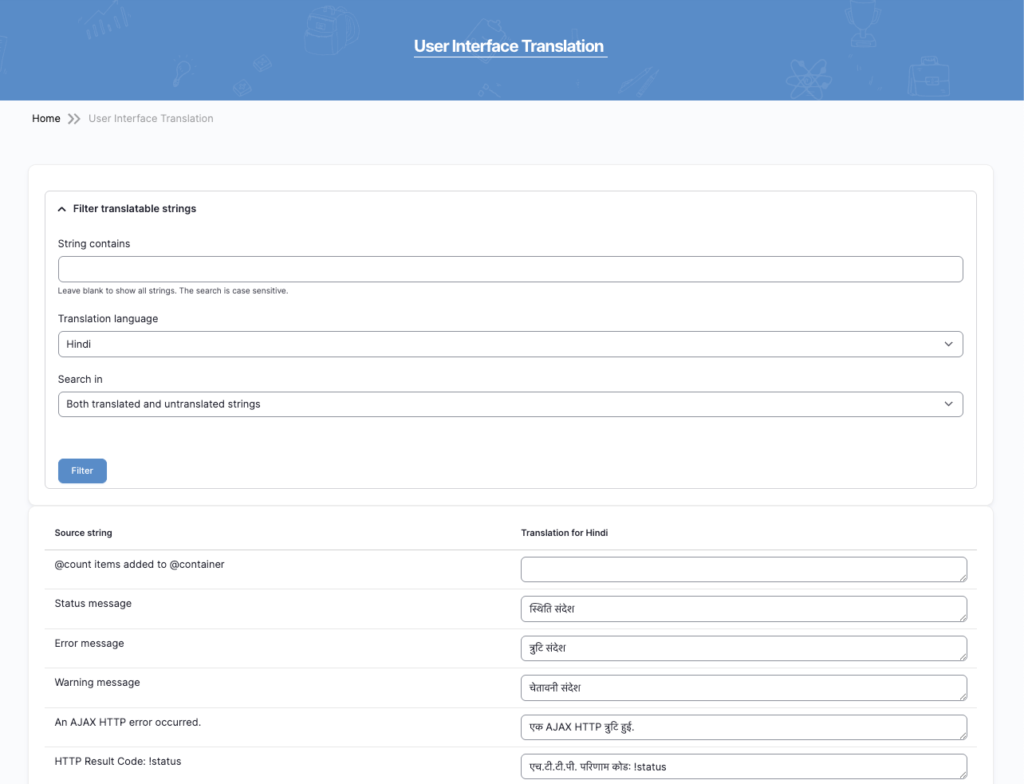
👉 This page is used to change system language
👉 You can translate words like:
- Submit
- Apply
- School
- Error messages
Steps (Simple)
1️⃣ Open Settings
Click Set Language
2️⃣ Choose Language
Select:
- Hindi
- English
3️⃣ (Optional) Search Word
Example: type Submit
4️⃣ Click Filter
Shows matching words
5️⃣ Add Translation
Example:
- Submit → जमा करें
- Error → त्रुटि
6️⃣ Save
Now system shows selected language
📌 Important
✔ If translation is empty → English will show
✔ Changes apply across whole system
✔ Used for buttons, messages, forms
💡 Example
Submit → जमा करें
Apply → लागू करें
School → विद्यालय
✅ Final
👉 This is manual translation
👉 Admin controls all language text
Set SMS/ Email
The Mail and SMS Settings section controls how the RTE MIS system communicates with students and schools.
These settings manage important notifications such as:
- Registration verification
- OTP login security
- Application status updates
- School verification updates
- School mapping updates
- Student admission updates
- Reimbursement notifications
Proper configuration ensures secure, timely, and accurate communication.
Only authorized administrators should modify these settings.
Path:
Administration → Configuration → RTE MIS Mail Settings
PART 1: EMAIL SETTINGS (Email Configuration)
Path:
Settings → Set SMS/Email → Email Setting
Mail settings control all email communication sent from the RTE MIS portal.
Email Verification
This feature ensures that when a new user registers, their email address is verified before they can access the system. It improves security and prevents fake registrations.
– Enable Email Verification (Toggle)
When turned ON, the system sends a verification email to the registered email address. The user must enter the verification code to activate their account.
- ON → Email verification required
- OFF → No email verification
Recommended: Keep ON for security and authenticity.
– Email Verification Subject
This is the title of the email that the user will see in their inbox.
Example:
Subject: RTE Portal Email Verification Code
Make sure the subject is clear and professional.
– Email Verification Message
Description:
This is the message content sent to the user. It must include the variable !code.
!code = The system automatically inserts the verification number here.
Example:
Dear User, your verification code is !code. Please use this to complete your registration.
⚠ Important: Do not remove !code, otherwise the email will not contain the verification number.
School Notification Email
This option sends email notifications to schools regarding their verification status in the portal.
Example:
- School approved
- School rejected
- School status updated
Enable this if schools need official email communication.
School Reimbursement Notification Email
Description:
This sends email notifications to schools regarding reimbursement-related updates.
Example:
- Reimbursement approved
- Reimbursement processed
- Reimbursement rejected
Enable only if reimbursement communication is handled via email.
Final Step (Mail Settings)
After making changes:
✔ Click Save Configuration
✔ Wait for confirmation message
PART 2: SMS SETTINGS (SMS Configuration)
Path:
Settings → Set SMS/Email → SMS Settings
SMS settings control all mobile text message communication in the portal.
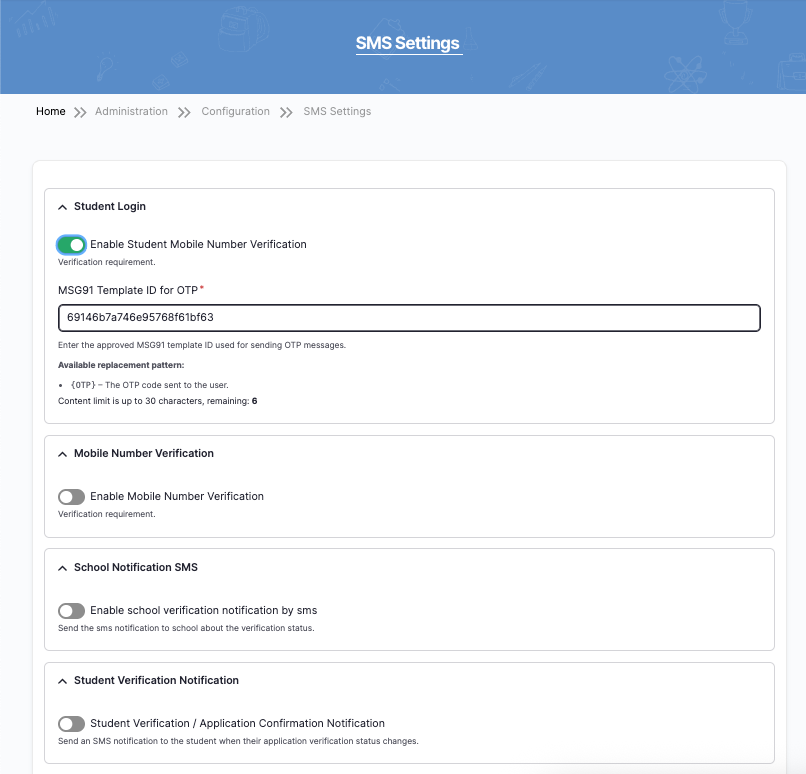
1.Student Login – OTP Verification
This feature sends a One-Time Password (OTP) to the student’s registered mobile number during login or registration.
It ensures:
- Secure login
- Mobile number authenticity
- Fraud prevention
Enable Student Mobile Number Verification
- ON → OTP required during login
- OFF → Login without OTP
✔ Recommended: Keep ON for security.
MSG91 Template ID for OTP
Description:
This is the approved SMS template ID provided by the SMS service provider (e.g., MSG91).
It is required for sending OTP messages legally (DLT approved template).
Variable used:
{OTP} → System automatically inserts the OTP number.
⚠ Do not modify Template ID unless the SMS provider gives a new one.
– Mobile Number Verification
Description:
This setting ensures that mobile numbers are verified before being used in the system.
Enable this if mobile verification is mandatory.
– School Notification SMS
Description:
Sends SMS alerts to schools when their verification or application status changes.
Example:
- School verified
- School rejected
- Status updated
Enable if schools should receive SMS alerts.
– Student Verification Notification
Description:
Sends SMS to students when:
- Application is verified
- Application status changes
- Admission confirmation updates
Enable if students must receive real-time SMS updates.
– Student Admission Workflow Notification
Description:
Sends SMS to students when:
- Students gets admission in the school
- Student admission status changes
- Admission confirmation updates
Enable if students must receive real-time SMS updates.
– School Reimbursement Notification SMS
Description:
Sends SMS to schools when:
- Schools gets notification when Reimbursement status changes.
Final Step (SMS Settings)
After changes:
✔ Click Save Configuration
✔ Do not refresh during saving
✔ Inform admin if major changes made
⚠ Important Guidelines
✔ Always take approval before changing settings
✔ Do not change Template IDs randomly
✔ Keep OTP verification enabled for security
✔ Record date and details of changes
Reimbursement Settings
Access Reimbursement Settings
Path:
Reimbursement → RTE MIS Reimbursement Settings
You will first see the configuration card.

Click Reimbursement Config Settings.
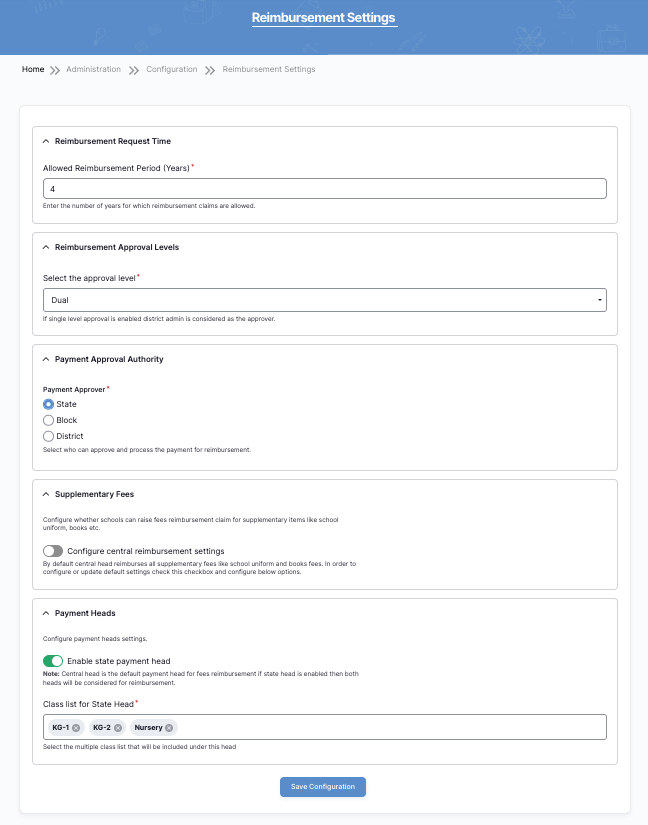
Reimbursement Request Time
Field: Allowed Reimbursement Period (Years)
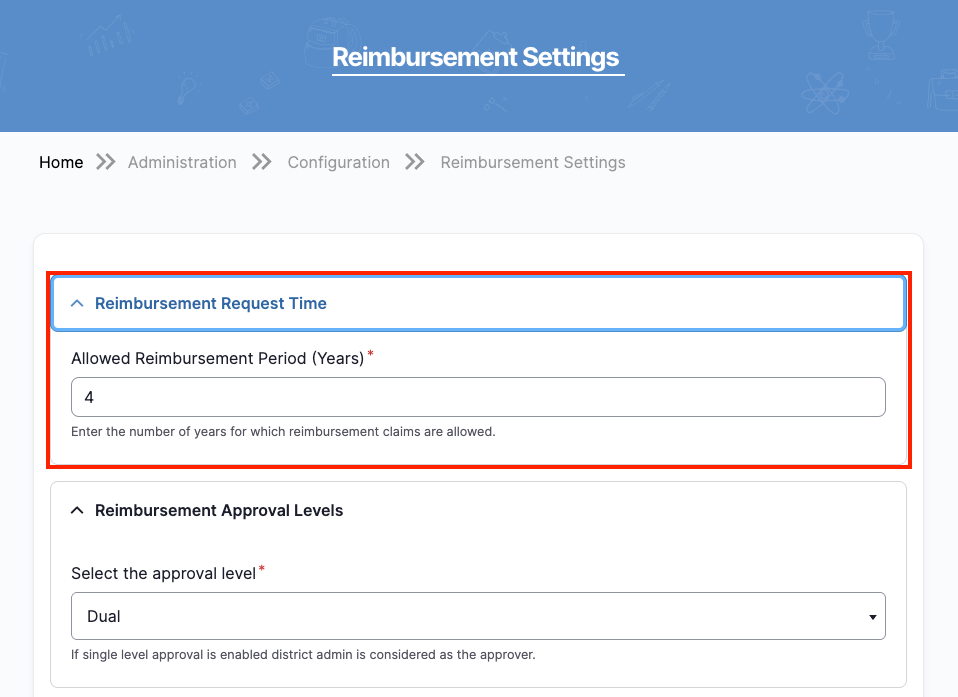
Purpose
Defines how many years a school can claim reimbursement for a student.
Procedure
- Enter the number of years (example: 4).
- Verify with a policy document.
- Do not exceed the approved limit.
⚠ Changing this impacts financial calculations.
Reimbursement Approval Levels
Purpose
– If single level approval is enabled district admin is considered as the approver.
– And If the Dual level approval is enabled district and state admin is considered as the approver.
Options
- Single Approval
- Dual Approval
Procedure
- Select the correct approval level.
- Confirm workflow alignment.
- Ensure approvers are assigned in roles.
⚠ Changing this affects approval workflow.
Payment Approval Authority
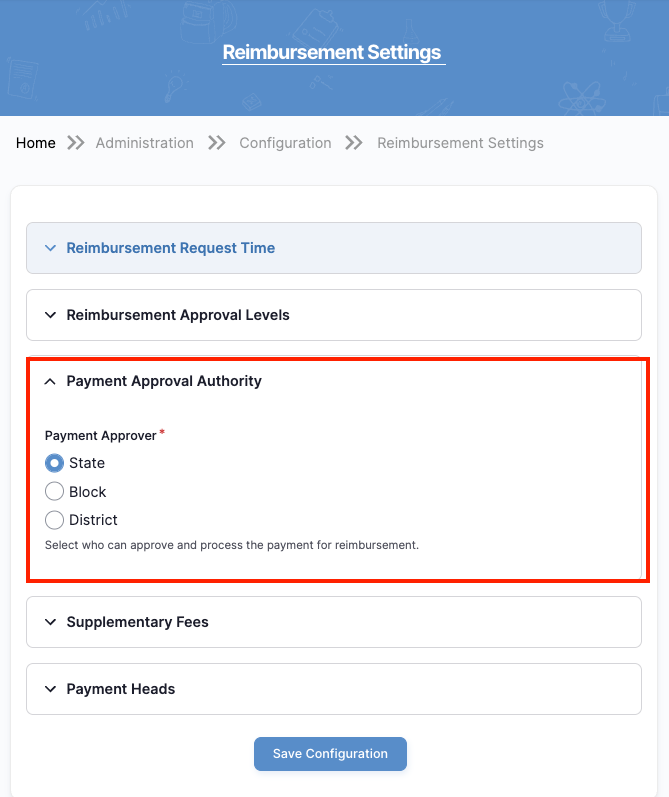
Purpose:
Configure who can approve and process reimbursement payments.
Options
- State
- District
- Block
Procedure
- Select correct authority.
- Confirm financial governance rules.
- Verify role permissions.
⚠ Incorrect selection may delay payments.
Supplementary Fees Configuration
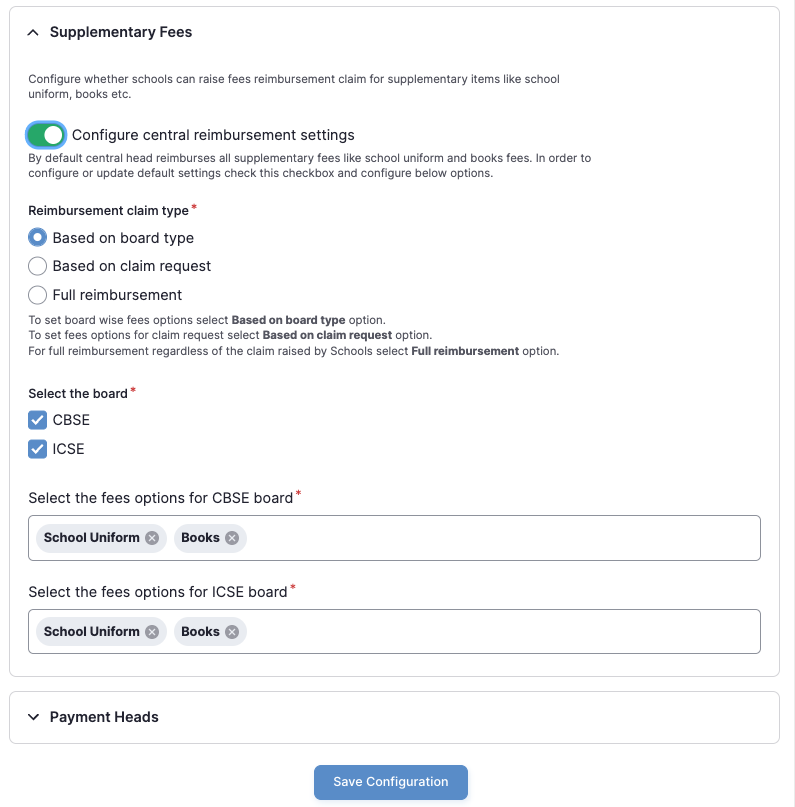
Purpose
This section allows the government to decide whether schools can claim reimbursement for additional items such as:
- School Uniform
- Books
- Other approved supplementary items
It defines how extra reimbursement claims are calculated.
Configure Central Reimbursement Settings (Toggle)
Meaning:
When this toggle is enabled (ON):
- Central/default reimbursement rules will apply.
- Schools can raise claims for supplementary items as per defined configuration.
When disabled (OFF):
- Supplementary claims may not be allowed.
✔ Keep enabled only if policy permits supplementary reimbursements.
Reimbursement Claim Type
This defines how supplementary reimbursement is calculated.
Available Options:
A. Based on Board Type
- Reimbursement rules depend on the school board.
- Example:
- CBSE schools → Different fee structure
- ICSE schools → Different fee structure
Use this when policy differs by board.
B. Based on Claim Request
- Schools submit claims.
- Reimbursement depends on the actual claim raised.
Use when flexible claim-based reimbursement is allowed.
C. Full Reimbursement
- Full amount reimbursed regardless of claim details.
- No board or claim-based restriction.
Use only if policy allows complete reimbursement.
Select carefully — this directly affects fund calculation.
Select the Board
You must choose applicable boards:
- CBSE
- ICSE
Select only approved boards under scheme.
Select Fees Options per Board
For each selected board, choose allowed supplementary items:
Example for CBSE:
- School Uniform
- Books
Example for ICSE:
- School Uniform
- Books
Select only policy-approved items.
⚠ Incorrect selection may cause financial miscalculation.
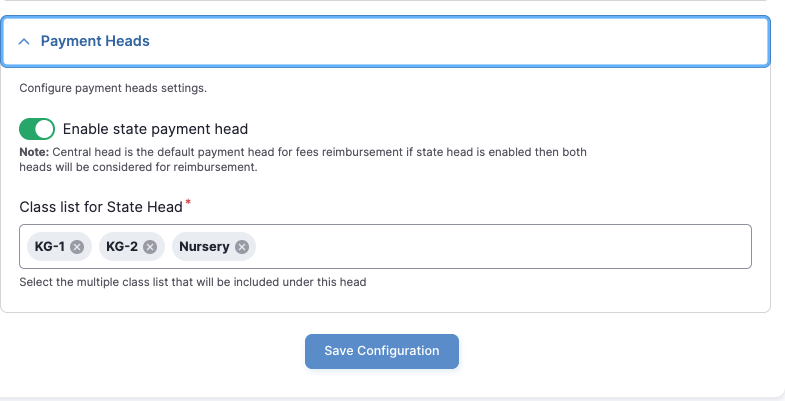
Payment Heads
Purpose
Payment Heads define which classes fall under the state-level reimbursement category.
Enable State Payment Head (Toggle)
When enabled:
- The state-level reimbursement head becomes active.
- If both Central & State heads are enabled, both may be considered.
⚠ Enable only as per financial governance structure.
Class List for State Head
Select eligible classes such as:
- Nursery
- KG-1
- KG-2
These classes will be included under the state payment head.
✔ Verify class eligibility as per scheme guidelines.
Final Step
After configuring:
- Click Save Configuration
- Wait for confirmation message.
- Record change in reimbursement log.
Monitoring Module
Navigation
Monitoring →
1. Review School Registrations
2. Students Application
3. Reimbursement Claims
4. Lottery Results
🏫 1. Review School Registrations
📋 Purpose
Check and approve school registrations.
🔍 Filter
- Current Status
- Submitted
- Send back to school
- Approved by BEO
- Approved by DEO
- Rejected
👉 Click Apply to filter
📊 Table Info
- UDISE Code
- School Name
- Status
- Location
- Approval Date
▶️ Action
- Click View
👁️ Inside School Detail
You can:
✔ View school details
✔ Check education & seats
✔ See verification history
✏️ Take Action
- Approve by BEO
- Approve by DEO
- Send back
- Reject
- Add comment
👨🎓 2. Students Application
Navigation
Monitoring → Students Application
📋 Purpose
View and monitor all student applications
🔍 Filters
- Student Name → Search by name
- Application Number → Search by ID
- Mobile Number → Search by phone
- Class → Select class (1st, etc.)
- School → Select school
👉 Click Apply to filter results
📊 Table Details
- Student Name
- Application Number
- Current Status
- Action (View button)
▶️ Action
- Click View → See full student details
👁️ Student Detail Page
What You Can See
👤 Basic Details
- Student Name
- Application Number
- Academic Year
- Mobile Number
👪 Parent Details
- Parent Type
- Mother/Father Name
- Aadhaar Number
👶 Student Info
- Gender
- Caste
- Religion
- DOB
🏠 Address Details
- Full Address
- Location (District → Block → Area)
- Pincode
📄 Documents
- Birth Proof
- Identity Proof
- Address Proof
🏫 School Preference
- Selected School
- Entry Class
- Medium
📜 Verification History
- Shows all status changes
- Example:
- Submitted
- Approved
- Rejected
🔁 Status Flow
Created → Submitted → Approved / Rejected
📌 Important Points
✔ All student data visible in one place
✔ Used for verification & tracking
✔ History helps in auditing
✔ No direct edit (only view/monitor)
💰 3. Reimbursement Claims
Navigation
Monitoring → Reimbursement Claims
📋 Purpose
👉 To view, track, and verify reimbursement claims submitted by schools
🔍 Filters
- Academic Session → Select year (e.g., 2025–26)
- Current Status → Submitted / Approved / Rejected
- Payment Head → Central / State
👉 Click Apply to filter data
📊 Table
- Academic Session
- UDISE Code
- School Name
- Payment Head
- Transaction Status
- Claim Amount (₹)
- Amount Received (₹)
- Balance (₹)
- Reimbursement Claim Status
- Action (View)
▶️ Action
👉 Click View to open claim details
👁️ Reimbursement Detail Page
📋 What You Can See
🏫 Basic Details
- Academic Year
- School Name
- Payment Head
➕ Additional Fees
- Uniform
- Books
📜 Claim Status
- Submitted / Approved / Rejected
🕓 Verification History
- Shows all status updates
- Example:
- Created → Submitted
- Approved
👨🎓 Student-wise Breakdown
Each student record includes:
- Student Name
- Guardian Name
- Class
- New/Old Student
- Medium
💸 Fee Details
- School Tuition Fees
- Uniform Fees
- Books Fees
- Govt Fees
- Total Amount
🔁 Status Flow
Created → Submitted → Approved → Paid
📌 Important Points
✔ Data is shown school-wise + student-wise
✔ Helps in financial verification
✔ Tracks payment status & balance
✔ Full audit history available
✔ No direct edit (only monitoring & approval flow)
✅ Final Summary
👉 Reimbursement Claims = Financial Tracking Module
- Filter claims
- View details
- Check student fees
- Track approval & payment
🎲 4. Lottery Results
Navigation
Monitoring → Lottery Results
📋 Purpose
👉 To view final student allotment after lottery process
🔍 Filters (Top Section)
- Search Student → Name / Mobile / Application No
- District → Select district
- Allocation Status → Allotted / Un-allotted
- Academic Cycle → Year (e.g., 2025–26)
👉 Click Apply to filter
👉 Click Reset to clear filters
📊 Table Details
Each row shows:
- Academic Cycle
- Student Name
- Application Number
- Mobile Number
- Lottery Type (Internal)
- Allocation Status
- School Name
- Entry Class
- Medium
📌 Allocation Status Meaning
- ✅ Allotted → Student got a seat
- ❌ Un-allotted → No seat assigned
⬇️ Download Option
👉 Click Download to export data (Excel/CSV)
🔄 Lottery Flow
Student Applied → Lottery Run → Result Generated → Seat Allotted / Not Allotted
📌 Important Points
✔ Data is final result of lottery
✔ No manual editing here
✔ Used for verification & reporting
✔ Helps track which student got which school
✔ Based on school mapping + seat availability
✅ Final Summary
👉 Lottery Results = Final Admission Allocation Screen
- Search student
- Check allotment
- View assigned school
- Download report
Reports
Navigation
Reports →
- School Registration Report
- School Mapping Report
- School Admission Report
- School Information Report
School Registration Report – Simple Guide
📍 Navigation
Reports → School Registration Report
🖥️ Report Page
📋 Purpose
👉 To view district-wise summary of school registrations and approvals
🔍 Filters (Top Section)
- Admission Cycle → Select year (e.g., 2026–27)
- Pending Approvals By
- All
- Block Officers (BEO)
- District Officers (DEO)
- Mapping Status → Mapped / Unmapped
👉 Click Apply to filter data
📊 Table Details
Each row shows district-wise data:
- No.
- District Name
- Blocks
- Total Schools
- Registered Schools
- Pending Approvals (BEO)
- Pending Approvals (DEO)
- Approved
- Mapping Status (Mapped)
📌 Column Meaning (Simple)
- Total Schools → Total schools available
- Registered Schools → Schools registered in system
- Pending (BEO/DEO) → Waiting for approval
- Approved → Successfully verified schools
- Mapping Status → Schools mapped to locations
⬇️ Download Option
👉 Click Download to export report (Excel)
🔄 Workflow (Simple)
School Added → School Registered → Approval (BEO → DEO) → Mapping → Report Generated
📌 Important Points
✔ Shows district-level summary (not individual schools)
✔ Helps track approval progress
✔ Useful for monitoring pending work
✔ Mapping status shows data completeness
✔ Used by State Admin for overview
School Mapping Report – Simple Guide
📍 Navigation
Reports → School Mapping Report
Description
- Displays mapping between schools and habitations (locations)
- Helps track:
- Which schools serve which areas
- Coverage of habitations
- RTE seat allocation per mapped area
🔹 Step 2: Select Filter Type
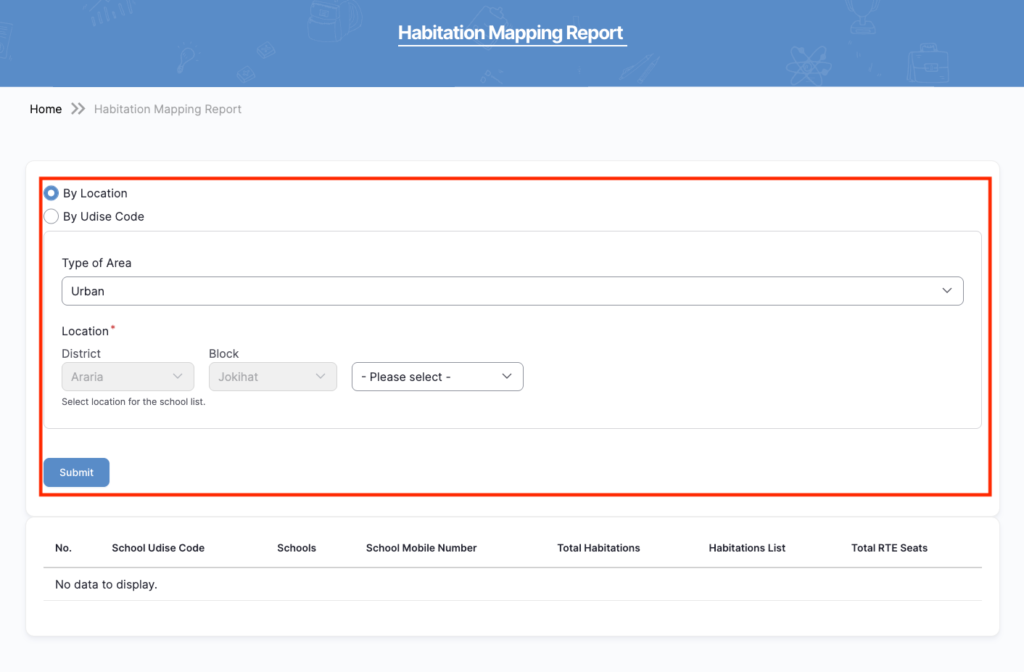
📌 Options
🔘 By Location (Default)
- Filter data based on:
- District
- Block
- Gram Panchayat
- Village/Habitation
👉 Used for area-wise mapping analysis
🔘 By UDISE Code
- Search mapping using specific School UDISE Code
👉 Used for school-specific mapping details
🔹 Step 3: Apply Filters
📋 Fields Explained
🌍 Type of Area
- Options:
- Urban
- Rural
👉 Determines the type of region for mapping
📍 Location Selection
| Field | Description |
| District | Auto-selected or predefined |
| Block | Based on district |
| Gram Panchayat | Available for rural areas |
| Village/Habitation | Final selection level |
👉 Fields are dependent (hierarchical selection)
🔘 Submit Button
👉 Click Submit
📌 Result
- Displays mapped schools based on selected filters
- If no data → shows “No data to display”
3. Student Admission Report
📍 Navigation
Reports → Student Admission Report
🖥️ Report Overview

📋 Purpose
👉 To view admission performance at district level (high-level summary)
✔ Compare districts
✔ Track performance
✔ Identify low-performing areas
🔍 Filters (District Level)
1️⃣ Admission Cycle
👉 Select academic year (e.g., 2026–27)
2️⃣ Application Status
- All
- Submitted
- Verified
- Approved
- Rejected
- Duplicate
- Incomplete
👉 Filters data based on application stage
3️⃣ Allotment Status
- Allotted
- Not Allotted
👉 Shows only students who got / didn’t get seats
4️⃣ Admission Status
- Admitted
- Not Admitted
👉 Shows final admission confirmation
▶️ Apply
👉 Click Apply to filter data
📊 Table Details (District Wise)
Each row shows:
- No.
- District Name
- Blocks
- Total Schools
- RTE Seats
- Applications Received
- Approved Applications
- Allotted Students
- Admitted Students
📌 Column Meaning
- Blocks → Total blocks in district
- Total Schools → Schools participating
- RTE Seats → Available seats
- Applications Received → Total applications
- Approved → Eligible students
- Allotted → Seats assigned via lottery
- Admitted → Final admissions
🔄 Admission Flow (District Level)
Application → Verification → Approval → Lottery → Allotment → Admission
4. School Information Report – Simple Guide
📍 Navigation
Reports → School Information Report
🖥️ Report Overview
📋 Purpose
👉 To view detailed information of schools (block-wise summary)
✔ Seats availability
✔ Medium-wise data
✔ Board-wise data
✔ Education level distribution
✔ Reimbursement status
🔍 Filters (if available)
Typically includes:
- District / Block
- Academic Year
👉 Helps narrow down data
📊 Table Details
Each row shows block-wise school data:
- No.
- Block Name
- Registered Schools
- Total Seats
- Total RTE Seats
📚 Medium-wise Distribution
- Hindi (Medium)
- English (Medium)
👉 Shows number of schools by teaching language
🏫 Board-wise Distribution
- CBSE
- ICSE
👉 Helps identify board affiliation
🎓 Education Level
- Primary
- Upper Primary / Middle
- Secondary
- Sr. Secondary
👉 Shows what level schools are offering
💰 Reimbursement Data
- Claims
- Reimbursed
- Pending
👉 Tracks financial status
📌 Column Meaning (Simple)
- Registered Schools → Total schools in block
- Total Seats → Total available seats
- RTE Seats → Seats reserved under RTE
- Medium → Language of teaching
- Board → Education board
- Education Level → Classes offered
- Claims → Reimbursement requests
- Reimbursed → Paid amount
- Pending → Yet to be processed
🔄 Data Flow
School Registration → Approval → Seat Setup → Mapping → Report Generated
Complete Workflow – State Admin
Login
→ Dashboard (View system overview)
→ Add Users (Create District & Block Admins)
→ Campaign Master
→ Location Mapping
→ School Mapping
→ Student Mapping
→ Lottery Execution
→ Monitoring
→ Review School Registrations
→ Track Student Applications
→ Verify Reimbursement Claims
→ Check Lottery Results
→ Reports
→ School Registration Report
→ School Mapping Report
→ Student Admission Report
→ School Information Report
→ Settings (Language, SMS/Email)
→ Logs (Audit & tracking)
→ Logout
📌 Simple Understanding
👉 Setup → Manage → Monitor → Analyze → Close
- Setup → Users + Campaign data
- Manage → Schools & Students
- Monitor → Applications & approvals
- Analyze → Reports
- Close → Logs & Logout