Introduction
This documentation describes the complete App Admin workflow in the RTE Portal (RTE-DPG-MIS).
It explains the responsibilities of the App Admin, including system setup, user management, data management, configuration, and portal maintenance required for running the RTE cycle smoothly.
To make the documentation easier to read, the full App Admin Journey is divided into four parts, following the actual order in which tasks are performed in the system. Users are advised to read the parts in sequence.
Part 1 – System Access & User Management
Login, password management, creating users, assigning roles, and controlling access.
Part 2 – Location & School Data Management
Managing location data, uploading school lists, and maintaining master data required for admissions.
Part 3 – Language & System Configuration
Configuring system settings, lottery settings, mail/SMS settings, reimbursement settings, and other operational controls.
Part 4 – Homepage Content Management
Updating homepage banner, notifications, videos, testimonials, and other public portal content.
This structure helps App Admin users follow the correct workflow from
system access → data setup → configuration → portal updates.
Part – 1: System Access & User Management
This section explains how the App Admin accesses the system and manages administrative users.The App Admin is responsible for creating, updating, and controlling system users and their roles.
1. System Access
1.1 Logging into the Admin Portal
- Open your browser (Chrome, Edge, etc.).
- Enter the Admin Login URL provided to you – (Usually something like: www.yoursite.com/user/login)

3. Enter:
- Username or Email
- Password
- Fill correct Captcha

4. Click Log in
1.2 If You Forgot Your Password
- On the login screen, click Forgot password

2. Enter your registered email address
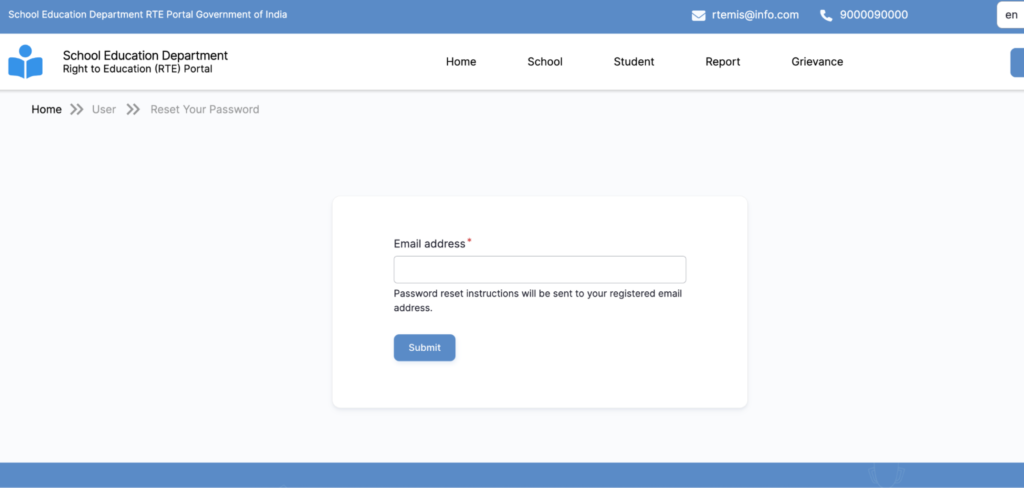
3. Click Submit
4. Check your email inbox
5. Click the reset link
6. Set a new password
If you don’t receive an email: Check Spam Folder
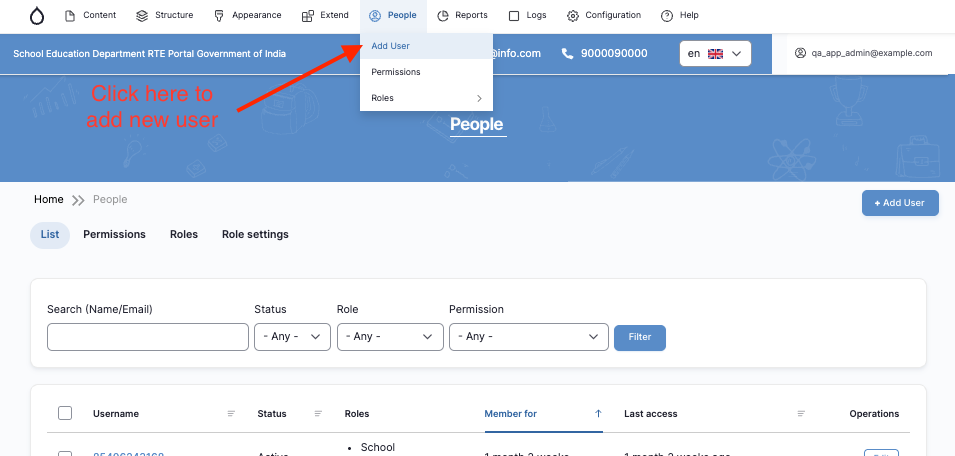
2. User Management: Creating Admins
In RTE-MIS, the App admin manages the users from the People section.
2.1 Creating a New “State Admin”
- From the top menu, click Manage
- Click People
- Click + Add user
4. Fill in:
- Add Admin Details
- Email address
- Mobile number
- Username
- Password
- Confirm Password
5. Click the Roles dropdown section
6. Select State Admin
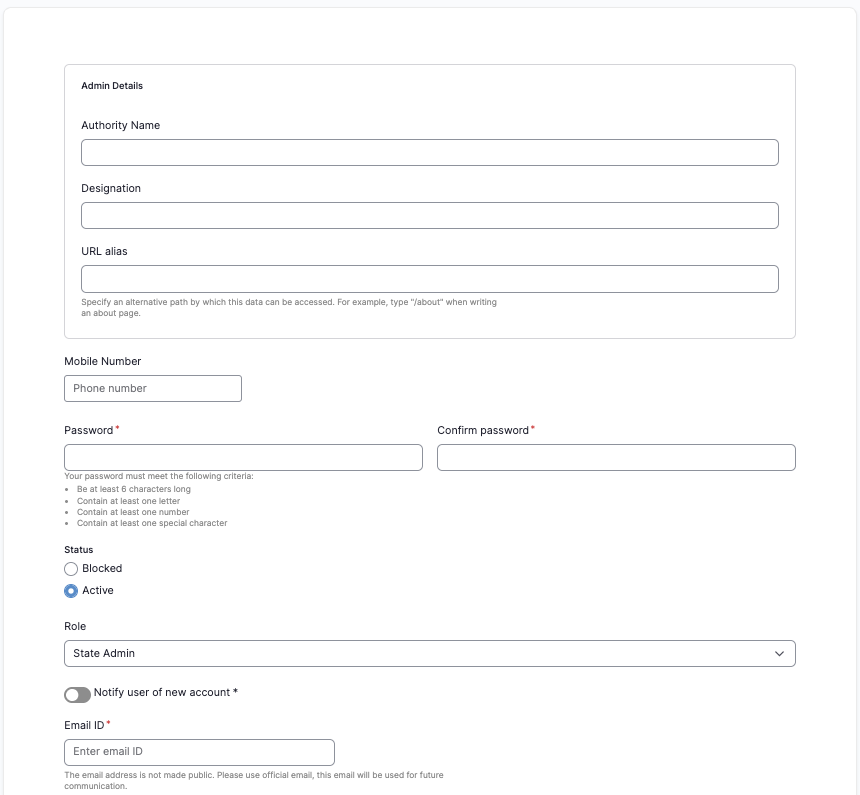
7. Click Create new account: The user is now created.
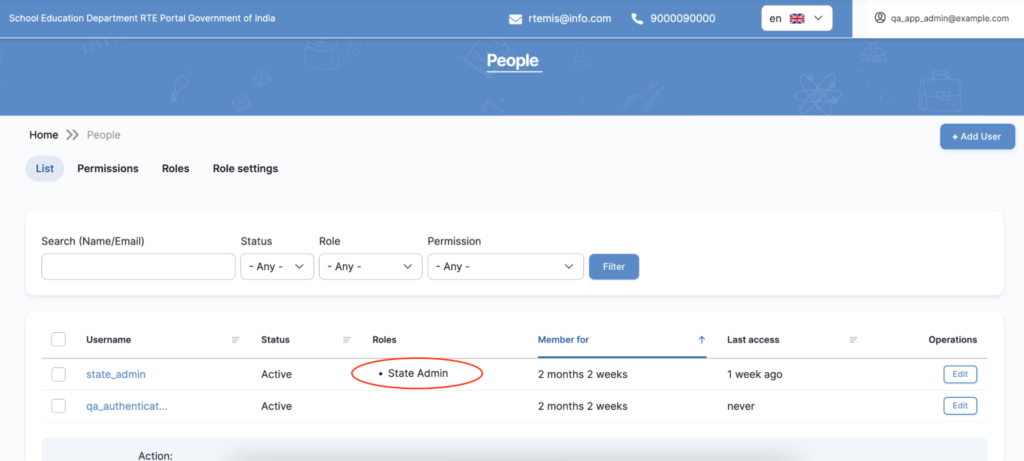
2.2 Assigning the Correct Role
A Role determines what a user can access and manage.
For a State Admin:
- Only select State Admin
- Do NOT select Administrator unless necessary
After saving: - Confirm the role appears next to their name in the user list
2.3 Sending Login Details
Share securely:
- Website URL
- Username
- Temporary password
Ask them to: - Log in immediately
- Change their password
- ⚠️ Never send passwords through unsecured messaging apps.
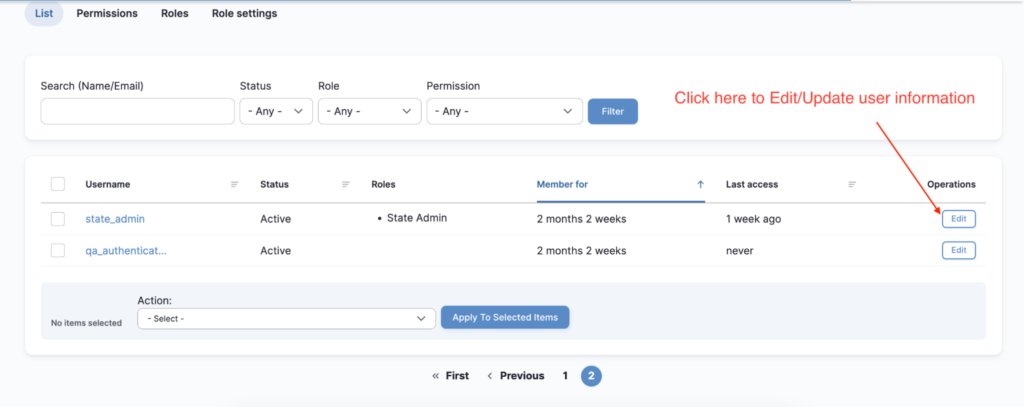
3. User Management: Managing Existing Users
3.1 Searching for a User
- Go to Manage
- Click People
- Use the Filter section:
- Enter username or email
- Click Filter

3.2 Updating User Information
- Click Edit next to the user

2. Update:
- Username
- Role (if required)

3. Click Save
3.3 Blocking (Suspending) a User
Instead of deleting, the App Admin can block them.
- Click Edit
2. Under Status, select Blocked
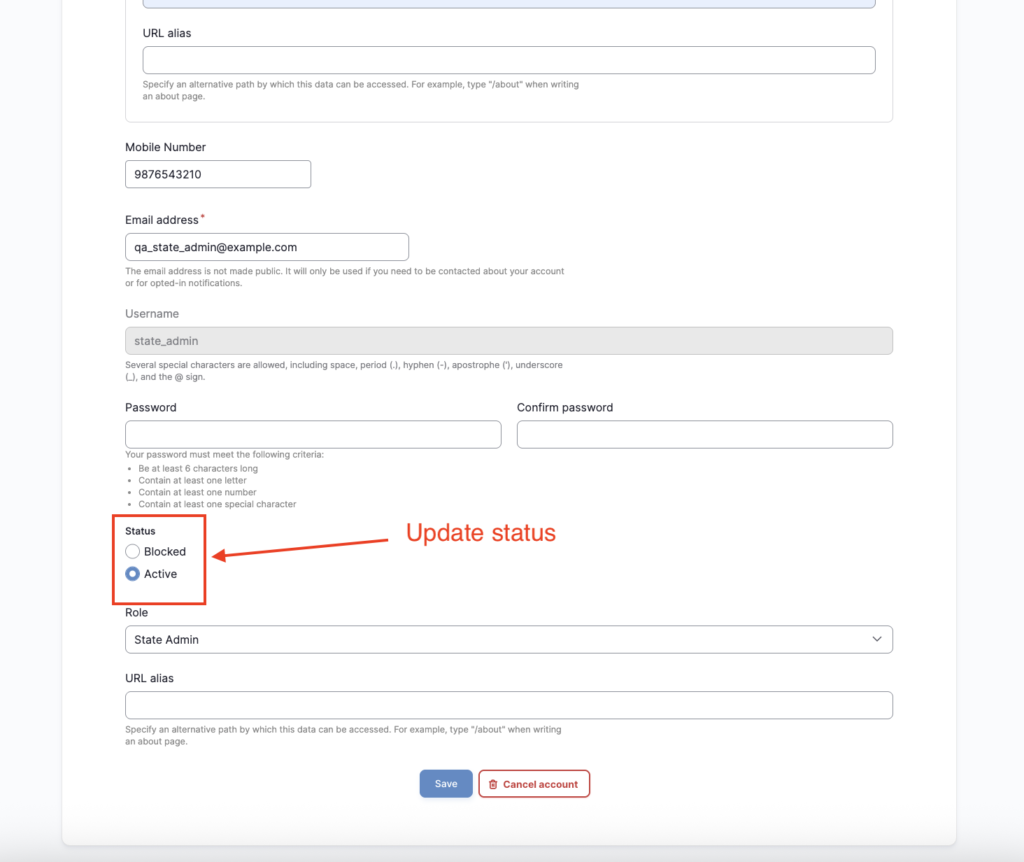
3. Click Save
Blocked users:
- Cannot log in
- Their past data remains safe
3.4 Deleting a User (Permanent Action)
⚠️ Warning: Deleting removes the account permanently.
- Go to People
- Select the user
- Click Cancel account

4. Select correct option and Confirm deletion

Only delete if absolutely necessary.
Part – 2: Location & School Data Management
This section explains how the App Admin manages master data required for the RTE admission system.
These datasets are essential for school mapping, seat allocation, and admission workflows.
4. Support Upload of Locations and School List (Only When Required)
Normally, State and District users manage:
- Location data (Districts, Blocks, Habitations)
- School list uploads
The App Admin supports this process only when required, such as:
- During first-time system setup
- During data migration
- When bulk corrections are needed
- When State/District users are unable to upload data
⚠️ Important Rule: The App Admin must always coordinate with the State authority before performing these actions.
When App Admin May Intervene
The App Admin may:
- Upload or correct location data
- Upload or correct the official school list
The detailed steps are explained in Sections 5 and 6 below.
5. Location Management (Only When Required)
When Should App Admin Add or Modify Locations?
Only in cases such as:
- First-time system setup
- A new district or block is officially created
- Data migration or bulk correction
- State/District users do not have upload access
⚠️ Confirmation from the State authority is mandatory before making changes.
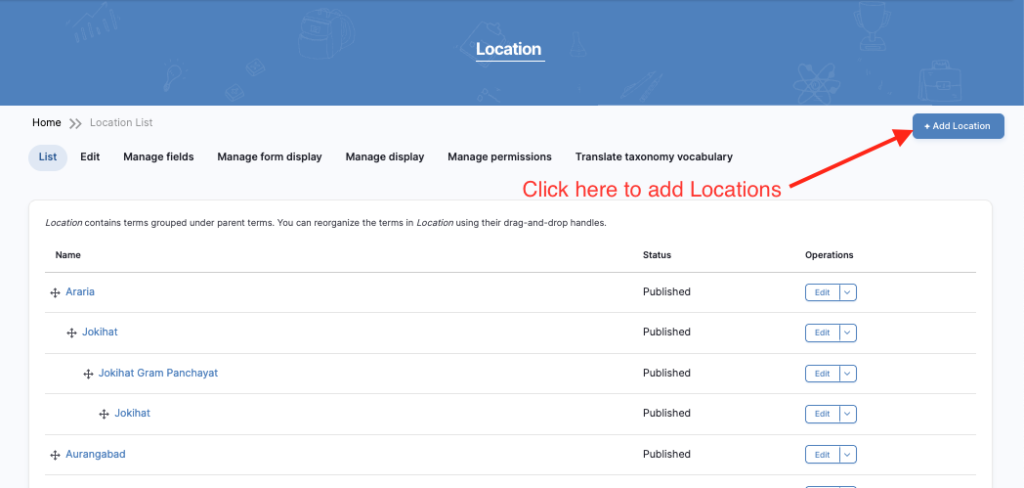
5.1 Add Location Manually (One-by-One)
Use this method when adding a small number of locations.
Steps:
- Go to Manage
- Click Structure
- Click Taxonomy
- Click Locations
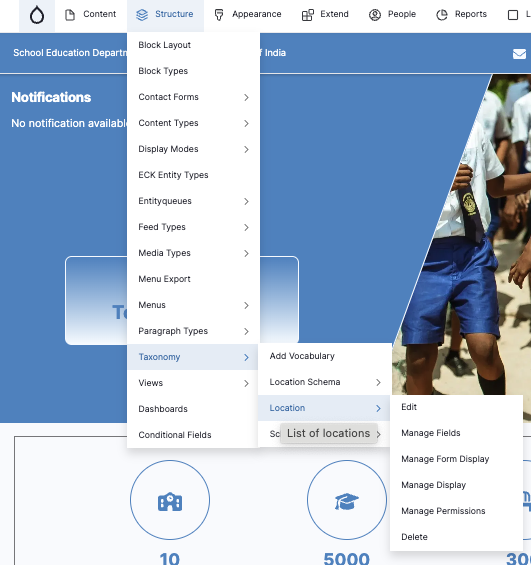
5. Click Add location
6. Fill the required details:
- Location Name
(Example: Pune District / Karad Block) - Parent Location
(Example: Select District when adding a Block)
7. Click Save

The new location will now be available in the system.
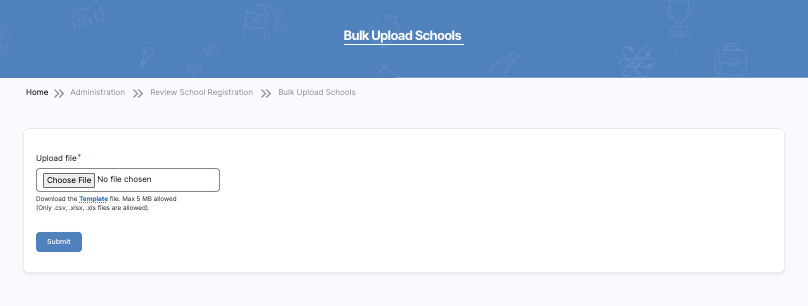
5.2 Bulk Upload Locations
Use this method when adding or correcting many locations.
Steps:
- Visit:
/admin/location/bulk-upload

2. Click Download Template
3. Fill the Template data with (Real District, Block, habitations…) Locations data.
⚠️ Do not change column headers.
- Return to the upload page.
- Click Choose File
- Select the filled Excel/CSV file.
- Click Save

After successful upload:
- Locations will appear in dropdown selections across the system.
6.School Management (Only When Required)
The official school list is mandatory for RTE operations.
Without it, schools cannot participate in admissions or seat allocation.
6.1 Navigate to School Management
Go to: Configuration → RTE MIS School Settings → Add School

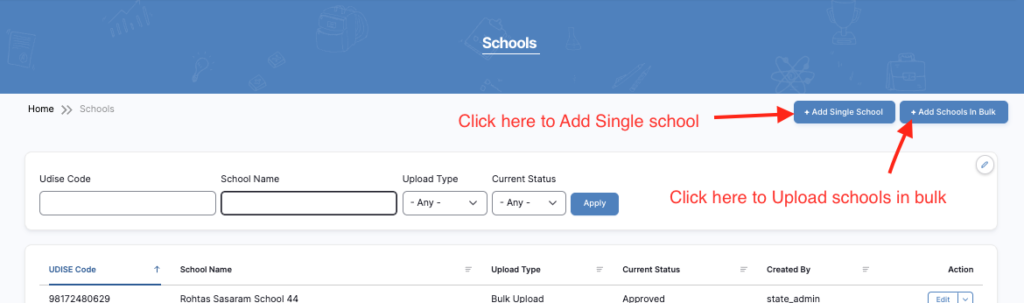
From here, you can:
- Add Single School
- Add Schools in Bulk
6.2 Add Single School
Use this when adding one school at a time.
Steps:
- Click Add Single School

2. Fill all required information:
- School UDISE Code
- School Name
- School Email
- School Mobile Number
- Type of Area (Urban/Rural)
- Aid Status
- Minority Status
- Location (District & Block mapping)
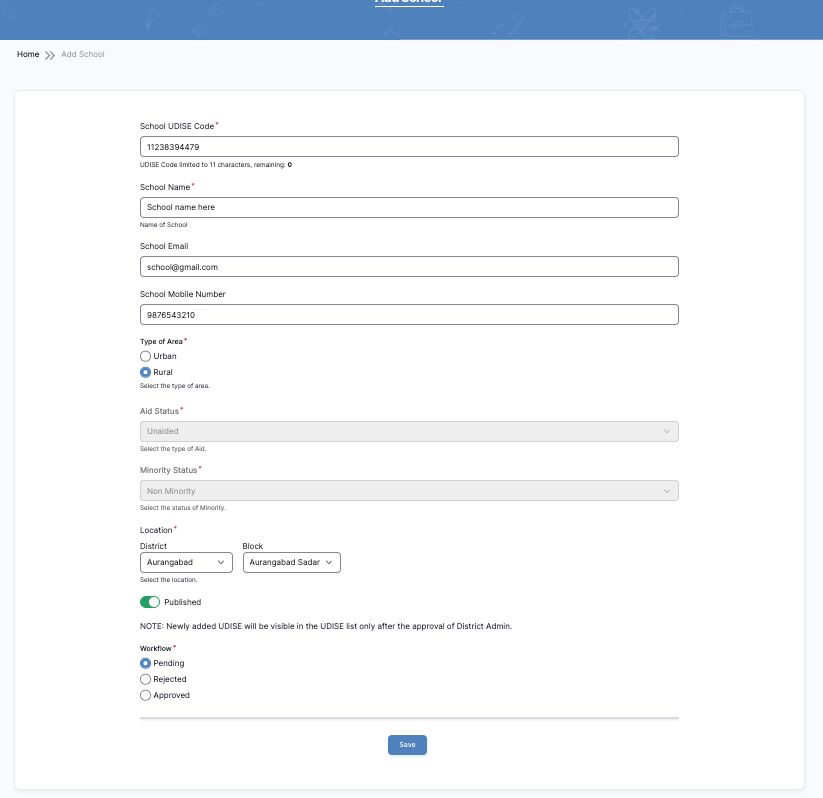
3. Click Save – The school is now stored in the system.
6.3 Add Schools in Bulk
Use this when uploading multiple schools.
Steps:
- Click Add Schools in Bulk
2. Click Download Template

3. Fill the template with:
- UDIISE Code
- School Name
- Aid Status
- Minority Status
- Type of Area
- District & Block Mapping
- Mobile Number
⚠️ Important:
- District and Block names must exactly match existing locations.
- Do not change column headers.
- Upload the Excel/CSV file.
- Click Submit
Outcome After Upload
Once completed successfully:
✅ Schools become available for onboarding
✅ Schools appear in RTE seat management
✅ Schools can participate in admission workflows
Final Administrative Reminder
✔ Always confirm with State authority before editing locations or schools
✔ Prefer bulk upload for large datasets
✔ Double-check UDISE codes to avoid duplicates
✔ Keep backup copies of upload files
Part – 3: Language & System Configuration
This section explains how the App Admin configures system settings, communication settings, and operational workflows.
These settings ensure the system operates correctly during the admission cycle.
7. Language & Translation Management
The system supports multiple languages so users can access the application in their preferred language.
The App Admin is responsible for:
- Adding new languages (if required)
- Managing translations
- Ensuring translated content is accurate
7.1 When Should App Admin Add a Language?
Add a new language only when:
- The State officially approves adding a new language
- The system is being launched in a new region
- A government mandate requires additional language support
⚠️ Always confirm before adding a new language.
7.2 Add a New Language
Steps:
- Go to Admin Dashboard
- Click Configuration
- Click Region and Languages
- Click Languages

- Click + Add Language
- Select the required language from the dropdown
- Click Add Language

The new language is now available in the system.
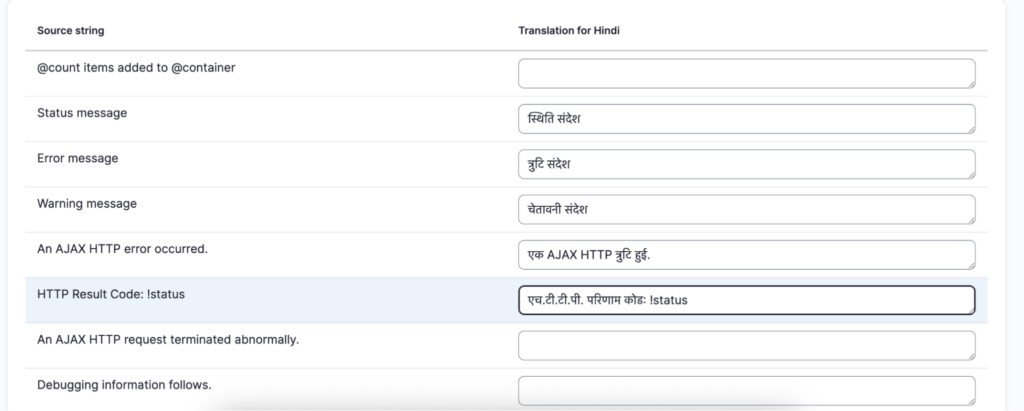
7.3 Translate Interface Text (Buttons, Labels, Messages)
Interface text includes:
- Buttons (Submit, Save, Login)
- Form labels
- System messages
- Validation errors
Steps:
- Go to Admin Dashboard
- Click Configuration
- Click Region and Languages
- Click User Interface Translation

- Use the Search field to find the text you want to translate
- Enter the translated text in the provided field
- Click Save
7.4 Verify Translation
After translating:
- Switch the website language from the language switcher.
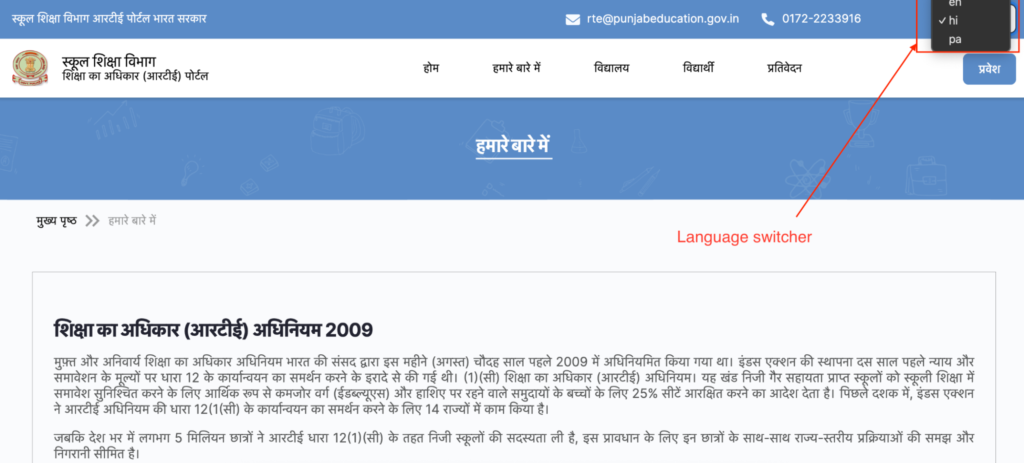
2. Review:
- Spelling
- Grammar
- Correct terminology
- Alignment/layout
Important Guidelines
✔ Do not use automatic translation tools without review
✔ Always verify official government terminology
✔ Maintain consistent wording across the system
✔ Test forms after translation to ensure labels display correctly
Outcome
After proper translation:
✅ Users can switch between languages
✅ Forms and messages appear in selected language
✅ System supports multilingual access for all regions
8. Configuration Section
Open Configuration Section
- From the top menu, click Configuration.
- A dropdown list will open.
- Select the required setting from the list.
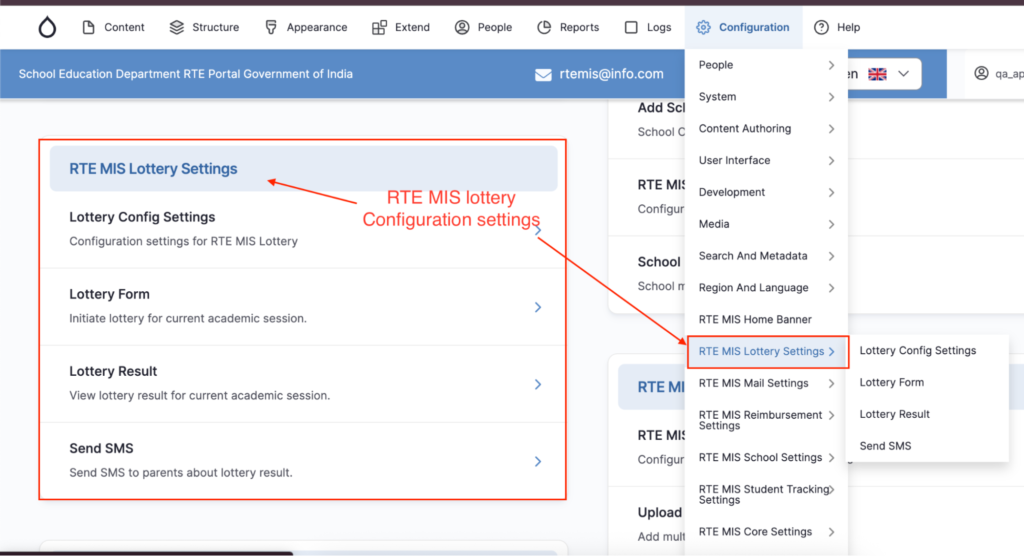
You will mainly use these RTE sections:
- RTE MIS Home Banner
- RTE MIS Lottery Settings
- RTE MIS Mail Settings
- RTE MIS Reimbursement Settings
- RTE MIS School Settings
- RTE MIS Student Tracking Settings
- RTE MIS Core Settings
1. RTE MIS Home Banner (Edit Homepage Banner)
When to use:
To change the homepage banner image.
Steps:
- Click Configuration
- Click RTE MIS Home Banner

3. Upload Banner Image
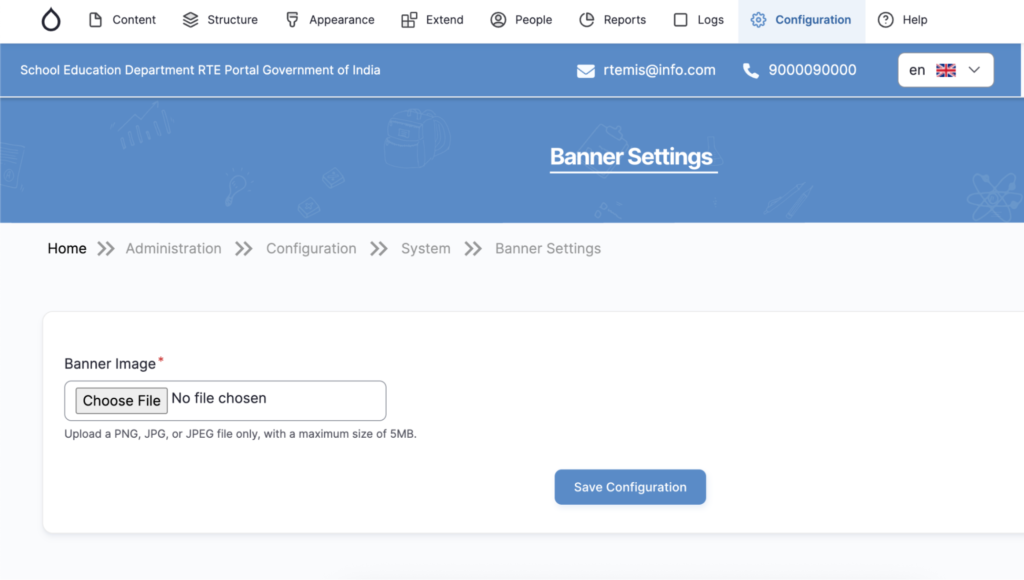
4. Click Save Configuration
Before:

After:
2. RTE MIS Lottery Settings:
- Go to:
- Configuration → RTE MIS Lottery Settings
2.1 Lottery Config Settings:
2.1.1. Purpose
- Set lottery timing
- Enable/Disable SMS notifications
- Manage SMS template IDs
- Save and verify changes safely
2.1.2. Who Can Perform This Action
- App Admin
- Authorized State Admin
⚠ School users should NOT access this section.
2.1.3. When to Use This Page
Use this page:
- Before publishing lottery results
- When SMS needs to be sent to students
- When instructed to update lottery timing
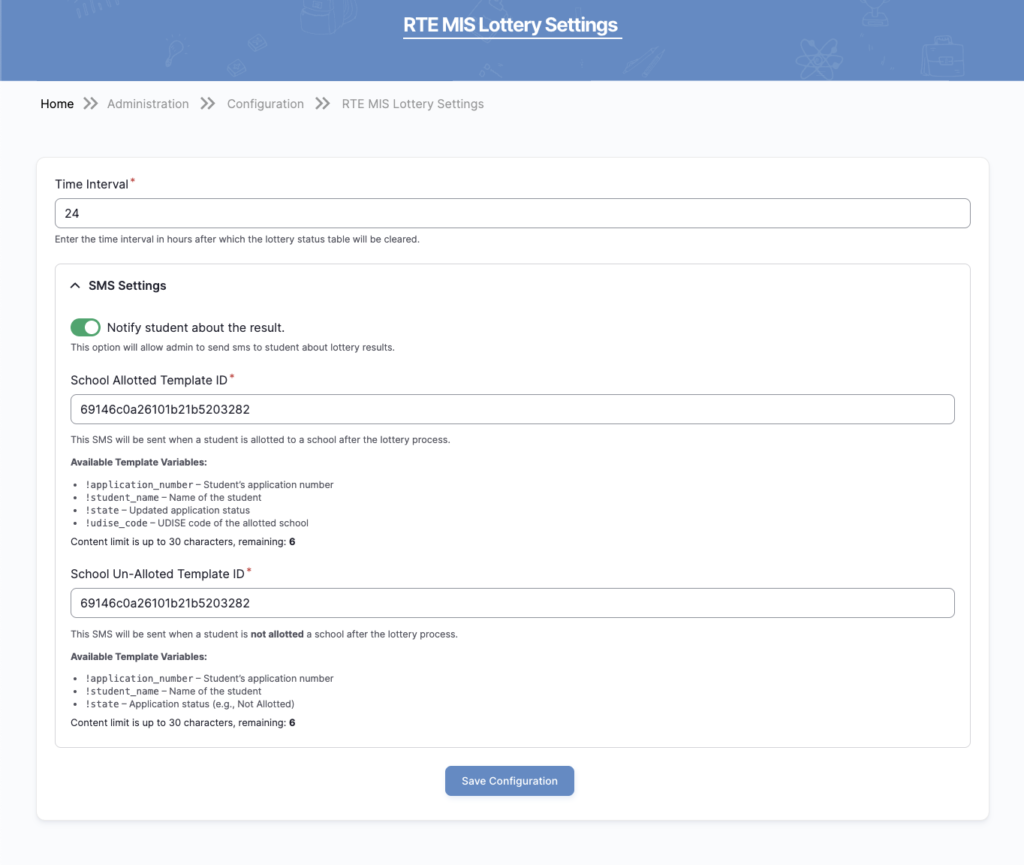
2.1.4. Step-by-Step Procedure
– Check Time Interval
- Locate Time Interval field.
- Ensure value is correct (Example: 24).
- Do NOT change unless instructed.
Meaning:
System clears lottery data after given hours.
– Enable SMS Notification
- Find Notify students about the result button.
- Ensure it is Green (ON) if results are ready.
✔ ON = SMS will be sent
❌ OFF = SMS will not be sent
⚠ Turn ON only after final approval.
Verify Template IDs
Check both fields carefully:
1. School Allotted Template ID
- Used for selected students
- Do not change without approval
2. School Un-Allotted Template ID
- Used for non-selected students
- Do not modify unless instructed
⚠ Wrong ID will cause SMS failure.
Save Configuration
- Click the Save Configuration button.
- Wait for confirmation message.
If not saved → Changes will not apply.
2.1.5. After Saving – Verification
- Confirm SMS toggle is ON
- Inform technical/admin team
- Monitor if SMS delivery starts
- Check student feedback
2.1.6. Important Do’s and Don’ts
Do:
- Double-check before saving
- Inform admin before major changes
- Keep record of change date
Don’t:
- Change Template IDs randomly
- Change Time Interval without instruction
- Turn OFF SMS after result announcement
2.1.7. Emergency Handling
If SMS not received by students:
- Inform technical team immediately
- Do not repeatedly change settings
- Do not resend without approval
2.1.8. Record Keeping
Maintain a simple log:
- Date of change
- Name of staff
- What was updated
- Reason for update
2.2 Lottery Form:
2.2.1. Purpose
To define the standardized procedure for conducting the lottery process in the RTE MIS Portal in a controlled, transparent, and approved manner.
2.2.2. Responsibilities
| Role | Responsibility |
| App Admin and State Authority | Execute lottery process in system |
| State Authority | Verify eligibility data |
| Technical Team | Provide system support |
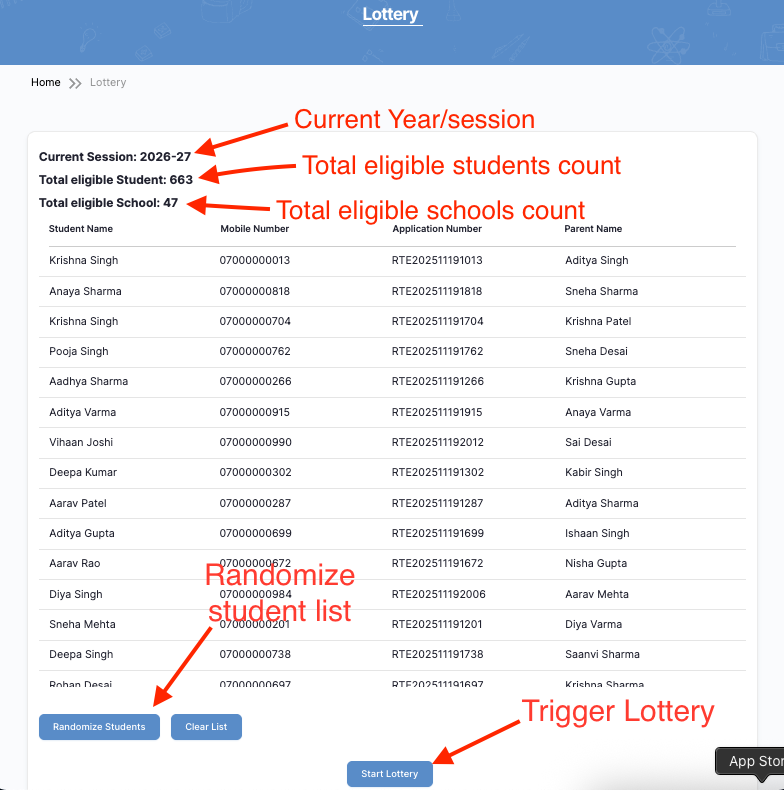
2.2.3. Pre-Lottery Checklist (Mandatory)
Before starting the lottery, verify:
- Correct Academic Session displayed
- Total Eligible Students count verified
- Total Eligible Schools count verified
- Student data validated
- Official approval received (written/email)
- SMS settings configured
⚠ Do not proceed if any item is incomplete.
2.2.4. Step-by-Step Lottery Execution Procedure
Step 1: Verify Session
- Confirm Current Session (Academic Year) is correct.
- If incorrect, stop immediately and inform the administrator.
Step 2: Verify Eligibility Counts
- Check Total Eligible Students.
- Check Total Eligible Schools.
- Cross-verify with approved official data.
If mismatch found → Stop process and escalate.
Step 3: Review Student List
- Scroll through the displayed student list.
- Ensure records appear complete and valid.
- No manual changes should be made at this stage.
Step 4: Randomize Students
- Click Randomize Students.
- Wait for system confirmation.
Purpose:
- Ensures fair and unbiased random order.
⚠ Click only once.
Step 5: Start Lottery
- Confirm final approval.
- Click Start Lottery.
System Action:
- Assigns schools automatically.
- Finalizes lottery result.
⚠ This action may not be reversible.
Step 6: Post-Lottery Actions
After successful execution:
- Verify lottery completion status.
- Ensure SMS notifications are enabled.
- Inform concerned authority.
- Initiate result publishing process.

1. Purpose
To define the standard procedure for viewing, verifying, filtering, and downloading lottery results in the RTE MIS Portal.
2. Accessing Lottery Results Page
- Navigate to the Configuration → RTE MIS Lottery Settings → Lottery Results page.
- Ensure the correct Academic Cycle is displayed in the results table.
3. Understanding the Results Table
The results table displays:
- Academic Cycle
- Student Name
- Application Number
- Mobile Number
- Lottery Type
- Allocation Status
- School Name
- Entry Class
- Medium
- Allotted School ID
✔ Verify data carefully before sharing publicly.
4. Using Filters (Search & Apply)
Step 1: Search Student
- Use search box to search by:
- Student Name
- Mobile Number
- Application Number
Step 2: Apply Filters
You may filter by:
- District
- Allocation Status
- Academic Cycle
Click Apply after selecting filters.
✔ Use filters to verify specific data segments.
5. Downloading Results
Click the Download button (Top Right).
Available options:
- Download PDF
- Download CSV
Use Cases:
| Format | Purpose |
| Official sharing & printing | |
| CSV | Data analysis & reporting |
⚠ Always verify filters before downloading.
6. Data Verification Checklist
Before publishing or sharing:
- Academic Cycle correct
- Allocation Status verified
- School names correct
- No duplicate records
- Official approval received
7. Important Guidelines
- Do not manually edit result data
- Use filters instead of scrolling manually
- Download only after final confirmation
- Maintain confidentiality of student data
2.4 Lottery – Send SMS:
1. Purpose
To define the standard procedure for sending SMS notifications to students after lottery results are finalized.
2. Scope
This SOP applies to:
- App Admin
- Authorized State Officers
⚠ District or School users should not send bulk SMS.
3. Pre-SMS Checklist (Mandatory)
Before sending SMS, verify:
- Lottery process completed successfully
- Results verified and approved
- Correct Academic Session confirmed
- SMS Templates configured correctly
- SMS balance available
- Approval received for sending SMS
⚠ Do not proceed without approval.
4. Step-by-Step SMS Sending Procedure
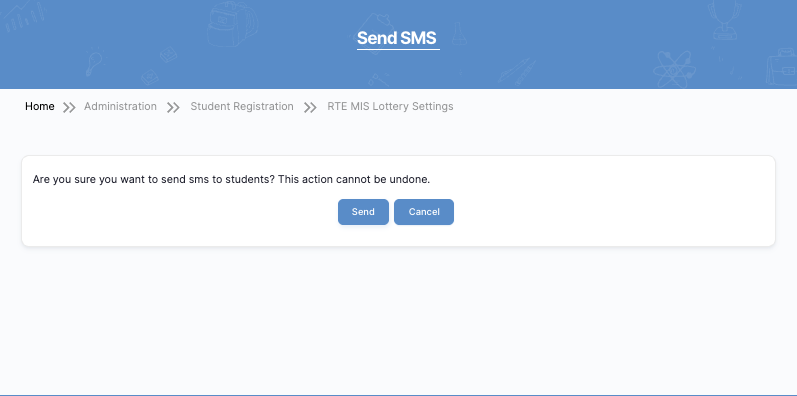
Step 1: Navigate to Send SMS Page
- Go to RTE MIS Lottery Settings
- Click Send SMS
System will display confirmation message:
“Are you sure you want to send sms to students? This action cannot be undone.”
Step 2: Review Confirmation Message
Important:
- SMS will be sent to all applicable students.
- This action cannot be reversed.
- Duplicate sending may cause confusion.
Step 3: Click Send
- Click Send to proceed.
- Click Cancel if not ready.
⚠ Click only once.
5. After Sending SMS
✔ Wait for system processing
✔ Do not refresh page immediately
✔ Inform concerned authority
✔ Monitor student feedback
6. Important Do’s and Don’ts
Do:
- Confirm approval before sending
- Ensure templates are correct
- Keep record of date and time
Do Not:
- Send SMS multiple times
- Refresh during processing
- Send without verifying results
3. RTE MIS – Mail & SMS Settings
The Mail and SMS Settings section controls how the RTE MIS system communicates with students and schools.
These settings manage important notifications such as:
- Registration verification
- OTP login security
- Application status updates
- School verification updates
- School mapping updates
- Student admission updates
- Reimbursement notifications
Proper configuration ensures secure, timely, and accurate communication.
Only authorized administrators should modify these settings.
Path:
Administration → Configuration → RTE MIS Mail Settings
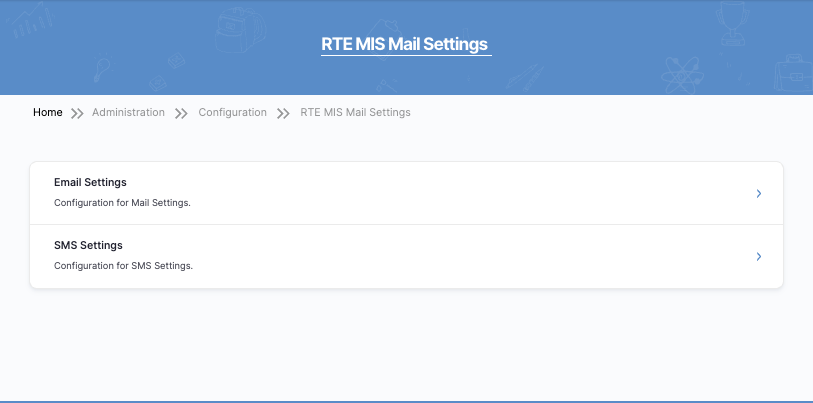
PART 1: MAIL SETTINGS (Email Configuration)
Path:
Administration → Configuration → RTE MIS Mail Settings → Email Settings
Mail settings control all email communication sent from the RTE MIS portal.
Email Verification
This feature ensures that when a new user registers, their email address is verified before they can access the system. It improves security and prevents fake registrations.
– Enable Email Verification (Toggle)
When turned ON, the system sends a verification email to the registered email address. The user must enter the verification code to activate their account.
- ON → Email verification required
- OFF → No email verification
Recommended: Keep ON for security and authenticity.
– Email Verification Subject
This is the title of the email that the user will see in their inbox.
Example:
Subject: RTE Portal Email Verification Code
Make sure the subject is clear and professional.
– Email Verification Message
Description:
This is the message content sent to the user. It must include the variable !code.
!code = The system automatically inserts the verification number here.
Example:
Dear User, your verification code is !code. Please use this to complete your registration.
⚠ Important: Do not remove !code, otherwise the email will not contain the verification number.
School Notification Email
This option sends email notifications to schools regarding their verification status in the portal.
Example:
- School approved
- School rejected
- School status updated
Enable this if schools need official email communication.
School Reimbursement Notification Email
Description:
This sends email notifications to schools regarding reimbursement-related updates.
Example:
- Reimbursement approved
- Reimbursement processed
- Reimbursement rejected
Enable only if reimbursement communication is handled via email.
Final Step (Mail Settings)
After making changes:
✔ Click Save Configuration
✔ Wait for confirmation message

PART 2: SMS SETTINGS (SMS Configuration)
Path:
Administration → Configuration → RTE MIS Mail Settings → SMS Settings
SMS settings control all mobile text message communication in the portal.
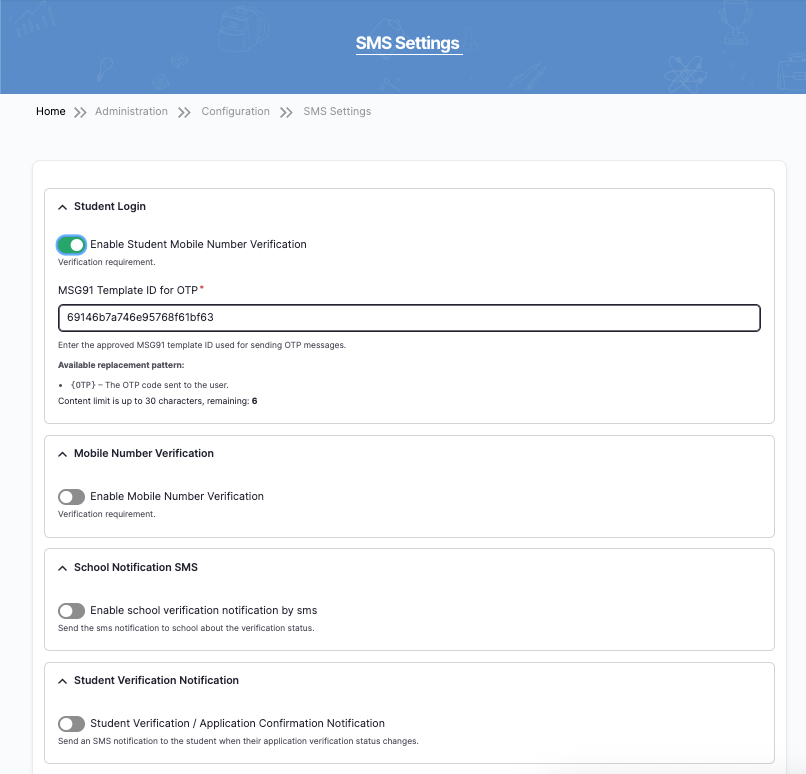
1.Student Login – OTP Verification
This feature sends a One-Time Password (OTP) to the student’s registered mobile number during login or registration.
It ensures:
- Secure login
- Mobile number authenticity
- Fraud prevention
Enable Student Mobile Number Verification
- ON → OTP required during login
- OFF → Login without OTP
✔ Recommended: Keep ON for security.
MSG91 Template ID for OTP
Description:
This is the approved SMS template ID provided by the SMS service provider (e.g., MSG91).
It is required for sending OTP messages legally (DLT approved template).
Variable used:
{OTP} → System automatically inserts the OTP number.
⚠ Do not modify Template ID unless the SMS provider gives a new one.
– Mobile Number Verification
Description:
This setting ensures that mobile numbers are verified before being used in the system.
Enable this if mobile verification is mandatory.
– School Notification SMS
Description:
Sends SMS alerts to schools when their verification or application status changes.
Example:
- School verified
- School rejected
- Status updated
Enable if schools should receive SMS alerts.
– Student Verification Notification
Description:
Sends SMS to students when:
- Application is verified
- Application status changes
- Admission confirmation updates
Enable if students must receive real-time SMS updates.
– Student Admission Workflow Notification
Description:
Sends SMS to students when:
- Students gets admission in the school
- Student admission status changes
- Admission confirmation updates
Enable if students must receive real-time SMS updates.
– School Reimbursement Notification SMS
Description:
Sends SMS to schools when:
- Schools gets notification when Reimbursement status changes.
Final Step (SMS Settings)
After changes:
✔ Click Save Configuration
✔ Do not refresh during saving
✔ Inform admin if major changes made
⚠ Important Guidelines
✔ Always take approval before changing settings
✔ Do not change Template IDs randomly
✔ Keep OTP verification enabled for security
✔ Record date and details of changes
4. RTE MIS Reimbursement Settings
Access Reimbursement Settings
Path:
Administration → Configuration → RTE MIS Reimbursement Settings
You will first see the configuration card.
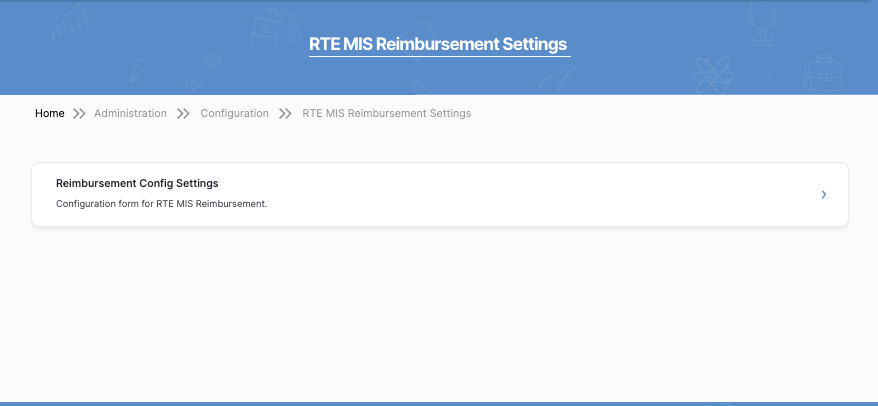
Click Reimbursement Config Settings.
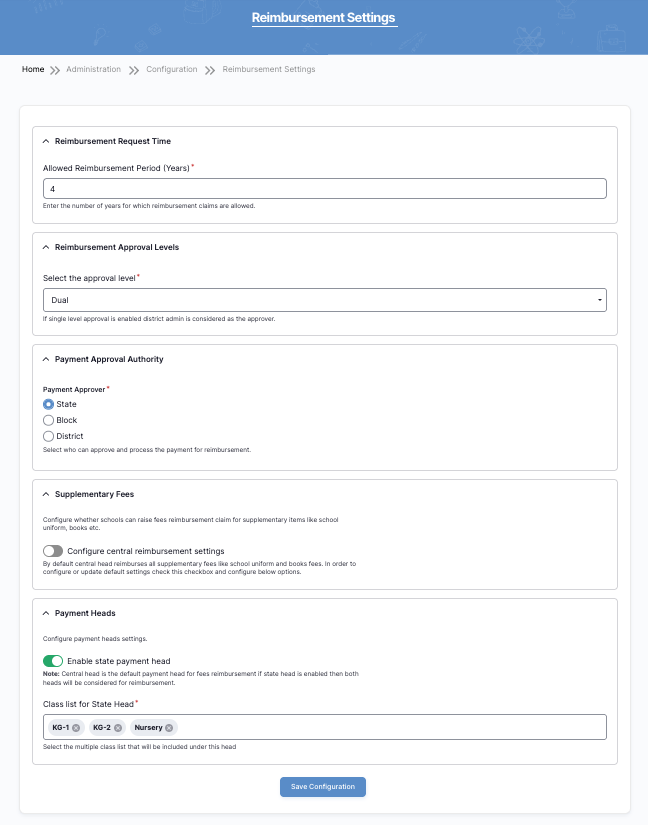
Reimbursement Request Time
Field: Allowed Reimbursement Period (Years)
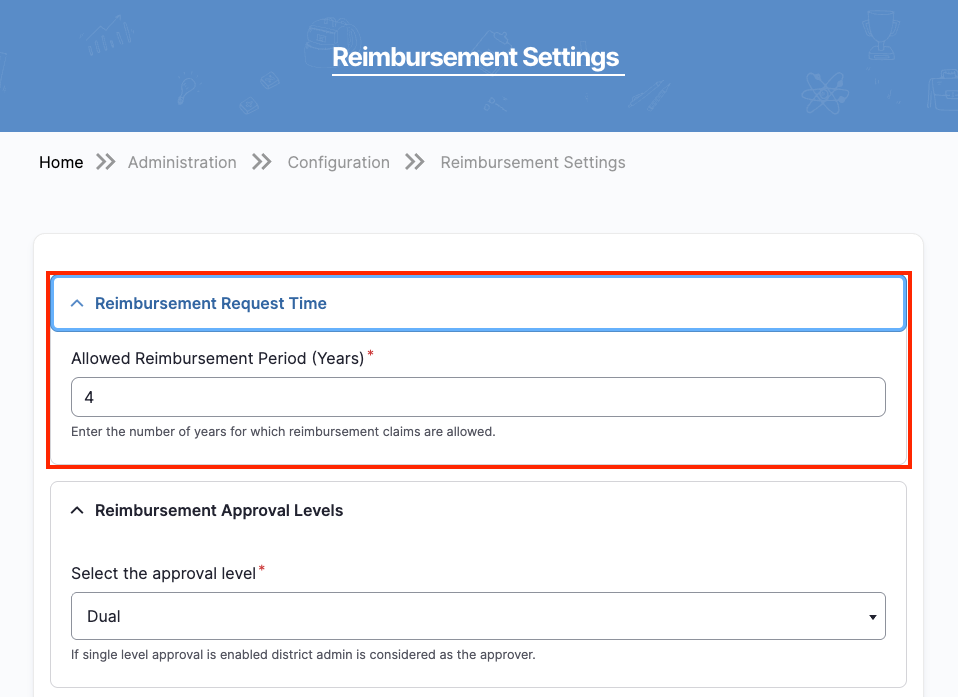
Purpose
Defines how many years a school can claim reimbursement for a student.
Procedure
- Enter the number of years (example: 4).
- Verify with a policy document.
- Do not exceed the approved limit.
⚠ Changing this impacts financial calculations.
Reimbursement Approval Levels
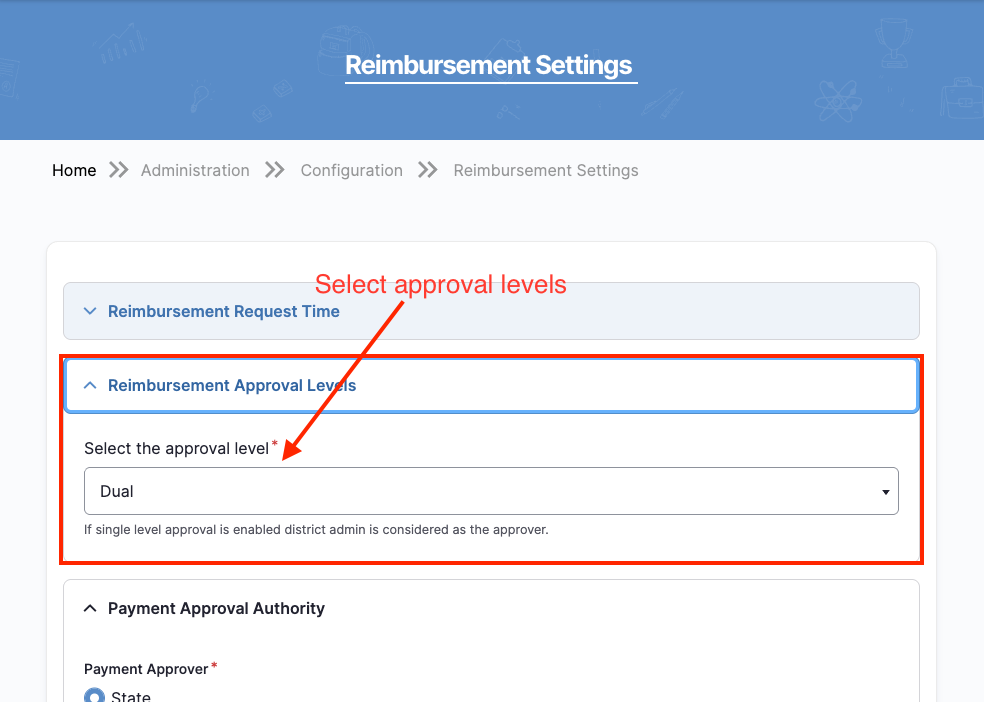
Purpose
– If single level approval is enabled district admin is considered as the approver.
– And If the Dual level approval is enabled district and state admin is considered as the approver.
Options
- Single Approval
- Dual Approval
Procedure
- Select the correct approval level.
- Confirm workflow alignment.
- Ensure approvers are assigned in roles.
⚠ Changing this affects approval workflow.
Payment Approval Authority

Purpose:
Configure who can approve and process reimbursement payments.
Options
- State
- District
- Block
Procedure
- Select correct authority.
- Confirm financial governance rules.
- Verify role permissions.
⚠ Incorrect selection may delay payments.
Supplementary Fees Configuration
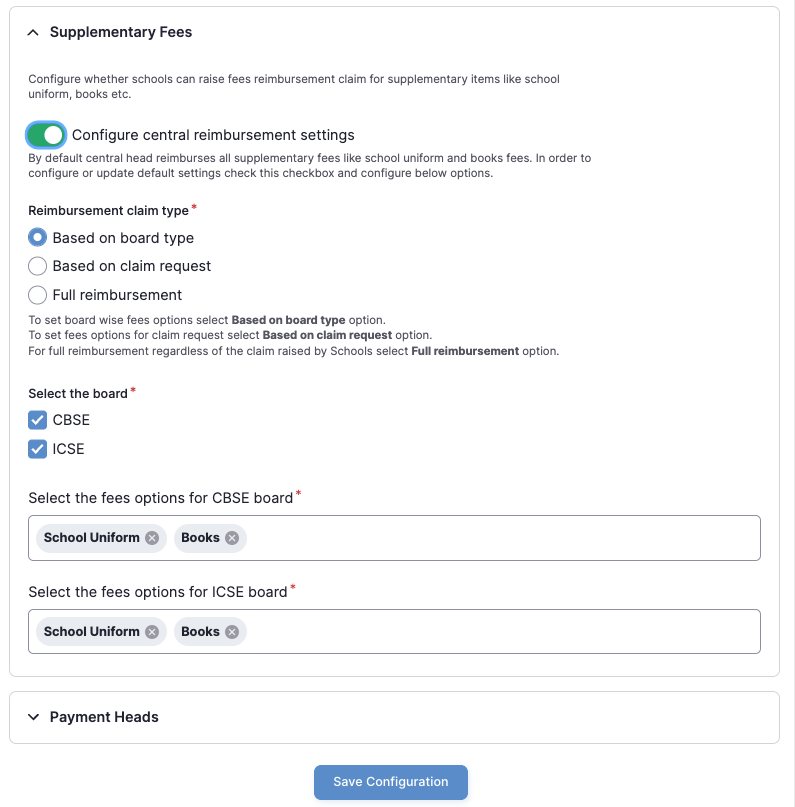
Purpose
This section allows the government to decide whether schools can claim reimbursement for additional items such as:
- School Uniform
- Books
- Other approved supplementary items
It defines how extra reimbursement claims are calculated.
Configure Central Reimbursement Settings (Toggle)
Meaning:
When this toggle is enabled (ON):
- Central/default reimbursement rules will apply.
- Schools can raise claims for supplementary items as per defined configuration.
When disabled (OFF):
- Supplementary claims may not be allowed.
✔ Keep enabled only if policy permits supplementary reimbursements.
Reimbursement Claim Type
This defines how supplementary reimbursement is calculated.
Available Options:
A. Based on Board Type
- Reimbursement rules depend on the school board.
- Example:
- CBSE schools → Different fee structure
- ICSE schools → Different fee structure
Use this when policy differs by board.
B. Based on Claim Request
- Schools submit claims.
- Reimbursement depends on the actual claim raised.
Use when flexible claim-based reimbursement is allowed.
C. Full Reimbursement
- Full amount reimbursed regardless of claim details.
- No board or claim-based restriction.
Use only if policy allows complete reimbursement.
Select carefully — this directly affects fund calculation.
Select the Board
You must choose applicable boards:
- CBSE
- ICSE
Select only approved boards under scheme.
Select Fees Options per Board
For each selected board, choose allowed supplementary items:
Example for CBSE:
- School Uniform
- Books
Example for ICSE:
- School Uniform
- Books
Select only policy-approved items.
⚠ Incorrect selection may cause financial miscalculation.
Payment Heads
Purpose
Payment Heads define which classes fall under the state-level reimbursement category.
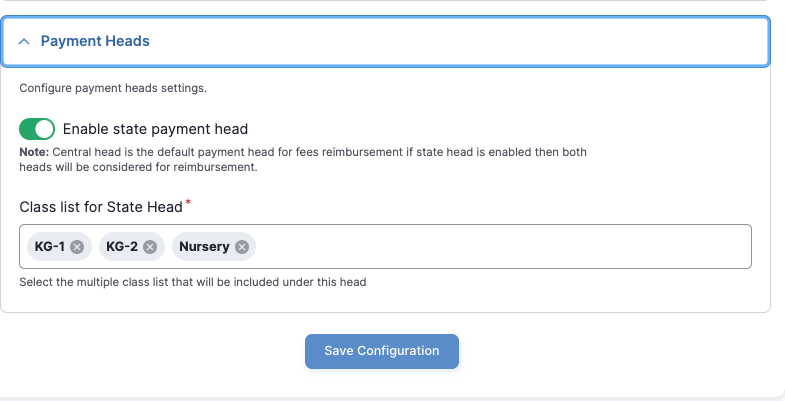
Enable State Payment Head (Toggle)
When enabled:
- The state-level reimbursement head becomes active.
- If both Central & State heads are enabled, both may be considered.
⚠ Enable only as per financial governance structure.
Class List for State Head
Select eligible classes such as:
- Nursery
- KG-1
- KG-2
These classes will be included under the state payment head.
✔ Verify class eligibility as per scheme guidelines.
Final Step
After configuring:
- Click Save Configuration
- Wait for confirmation message.
- Record change in reimbursement log.
5. RTE MIS School Settings
- School Verification Configuration
- School Mapping (Habitation Mapping)
PART 1 School Verification Settings
Access Path
Administration → Configuration → RTE MIS School Settings

You will see options like:
- Add School
- RTE MIS School Config Settings
- School Mapping
Click RTE MIS School Config Settings:
School Verification – Single Approval Process
Purpose
This setting controls how school verification is approved.
Option: Enable Single Approval Process
If Enabled:
- Only one authority approves school verification.
If Disabled:
- Dual approval process applies(Need Block admin and District admin approves).
Select Role
Choose which role will approve school verification:
Options:
- Block Admin
- District Admin
Select as per official approval hierarchy.
⚠ Changing this affects workflow.
Final Step
Click Save Configuration after selection.
PART 2: School Mapping (Habitation Mapping)
Access Path
Administration → Configuration → RTE MIS School Settings → School Mapping

- Select District
- Choose the district from dropdown.
- Blocks will load automatically.
- Select Available School
Choose school to map.
- Select Type of Area
Options:
- Rural
- Urban
Select correctly as per school location.
- Gram Panchayat Selection (If Rural)
Select correct Gram Panchayat.
- Habitation Mapping
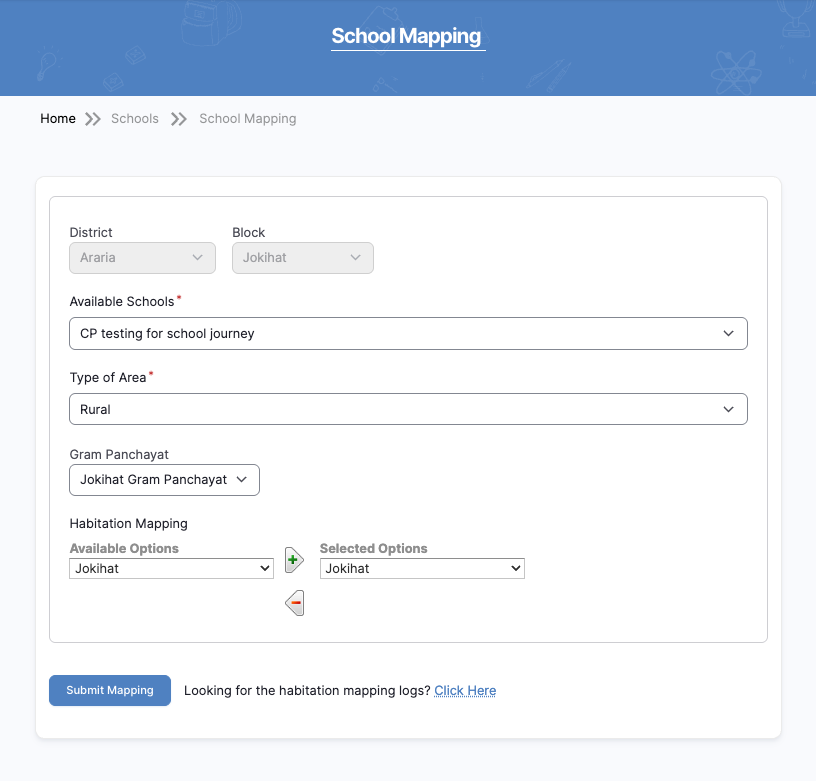
How It Works:
- Left side: Available Options (Habitations)
- Right side: Selected Options
- Use ➕ button to move habitation to selected list
✔ Map correct habitation to correct school.
- Submit Mapping
Click Submit Mapping to save.
You can view logs using:
“Looking for the habitation mapping logs? Click Here”
6. RTE MIS Student Tracking Settings
This section allows the App Admin to:
- Configure student auto-renewal settings
- Define allowed class levels for tracking
- Bulk import students for tracking
⚠️ Only authorized administrators should modify these settings.
1. How to Access Student Tracking Settings
Navigation Steps:
- Go to the top menu.
- Click Configuration
- Click RTE MIS Student Tracking Settings
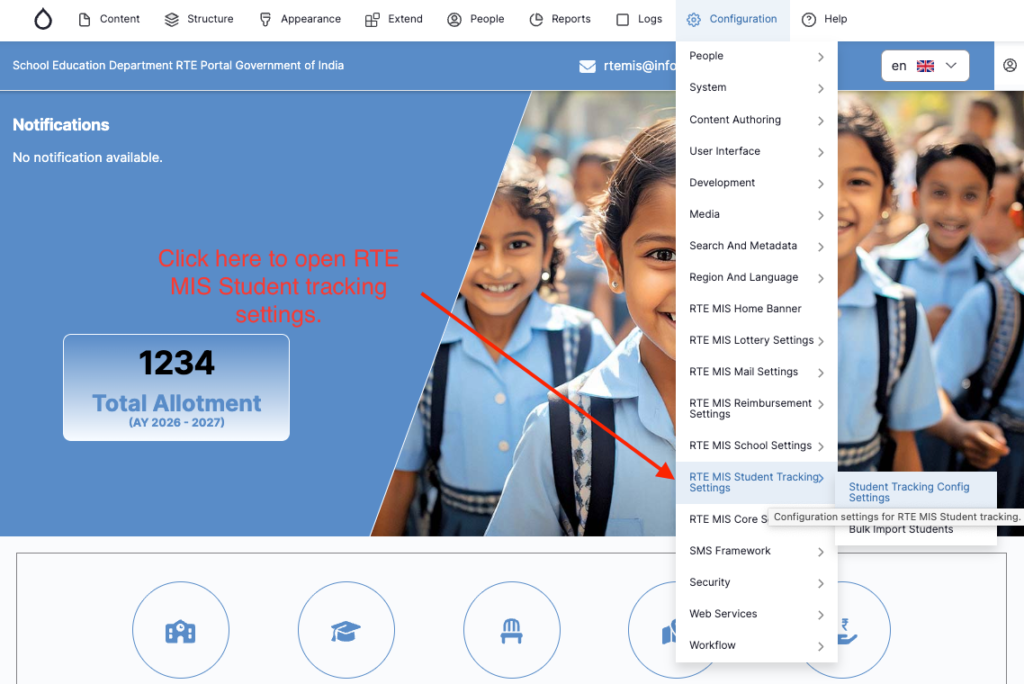
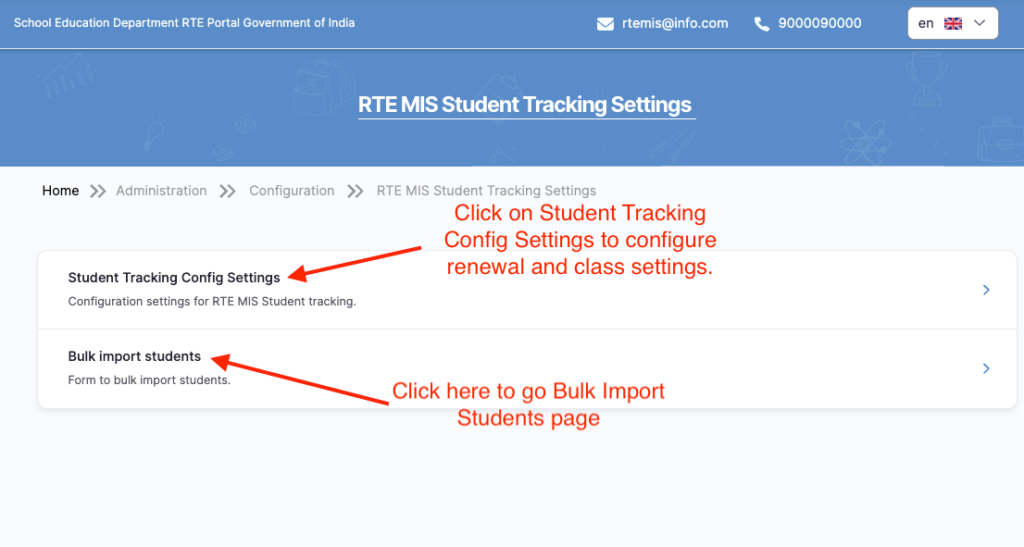
You will see two options:
- Student Tracking Config Settings
- Bulk Import Students

2.Student Tracking Config Settings
Click Student Tracking Config Settings to configure renewal and class settings.
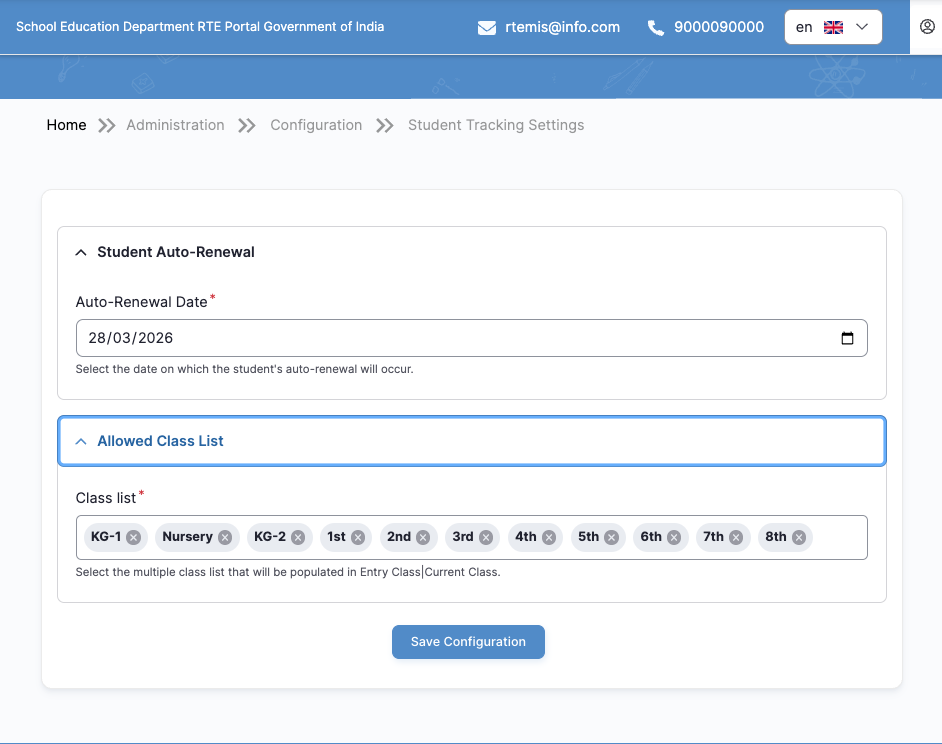
2.1 Student Auto-Renewal
This section defines when student records will automatically renew to the next academic level.
Field:
- Auto-Renewal Date* (Mandatory)
How to Set:
- Click inside the Auto-Renewal Date field.
- Select the correct date from the calendar.
- Ensure the date matches the official academic transition date.
- Click Save Configuration.
⚠️ Important:
This date controls when student class progression occurs automatically.
2.2 Allowed Class List
This section defines which classes are available for student tracking.
Field:
- Class List* (Multiple selection allowed)
How to Configure:
- Click inside the Class List field.
- Select all applicable classes (e.g., KG-1, Nursery, 1st, 2nd, etc.).
- Remove any class by clicking the “×” icon next to it.
- Click Save Configuration.
✔ Only selected classes will be available for student tracking and renewal.
3. Bulk Import Students for Tracking
This feature allows the App Admin to upload multiple student records at once into the Student Tracking system.
It is recommended when importing large student datasets instead of adding them one by one.
3.1 When to Use Bulk Import
Use this feature when:
- Migrating student data from another system
- Uploading new academic session data
- Correcting large numbers of student records
- First-time system setup
⚠️ Ensure that:
- Schools are already uploaded in the system
- Allowed Class List is configured
- Academic session is correct
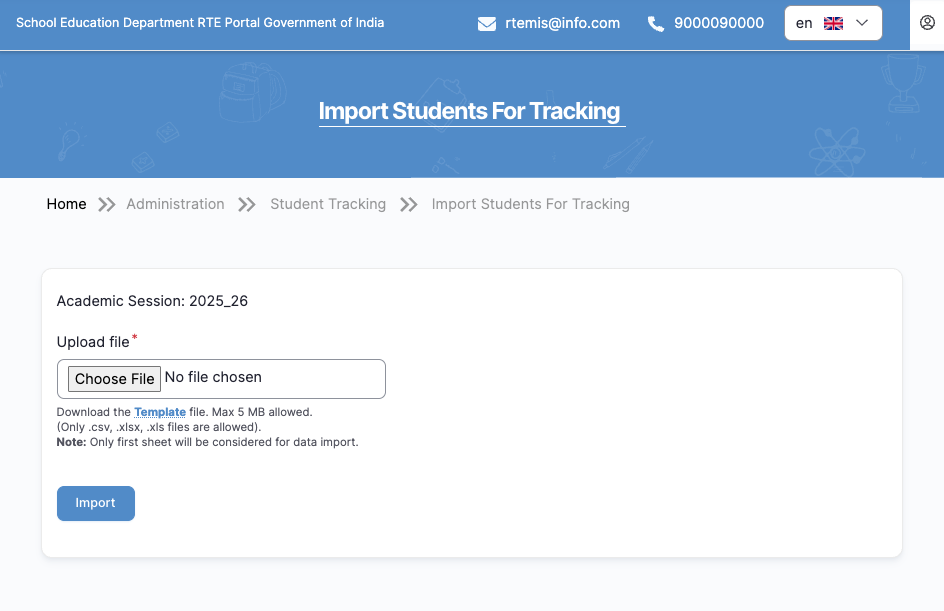
3.2 How to Access Bulk Import
Navigation Steps:
- Click Configuration
- Click RTE MIS Student Tracking Settings
- Click Bulk Import Students
You will be redirected to the Import Students For Tracking page.
3.3 Step-by-Step Process to Upload Students
Step 1: Download the Template
- Click Template (Download link)
- Save the Excel file to your computer
⚠️ Important Rules:
- Do NOT change column names
- Do NOT delete any columns
- Only first sheet will be processed
Step 2: Fill Student Data in the Template
Open the downloaded template and enter student details.
Required fields include:
- Mobile Number
- Residential Address
- School UDISE Code
- Entry Class
- Current Class
- Entry Year
- Medium
- Application Number
- Religion

Data Entry Guidelines:
✔ Mobile number must be 10 digits
✔ UDISE code must match existing school
✔ Class names must match configured Allowed Class List
✔ Entry Year format must be: YYYY-YY (Example: 2021-22)
✔ Application Number must be uniqueStep 3: Save the File
Save the file as:
- .xlsx
- .xls
- .csv
File size must be under 5 MB.
Step 4: Upload the File
- Click Choose File
- Select the completed Excel file
- Click Import
Step 5: Review Upload Result
After clicking Import:
If Successful:
- Confirmation message appears
- Students are added to tracking system
If Errors Occur:
- Error message will be displayed
- Download error details (if available)
- Correct data in Excel
- Re-upload file
7. RTE MIS Core Settings
This section explains how the App Admin can:
- Configure Core System Settings
- Configure Rural/Urban location classification
- Define Entry Class type
- Upload multiple locations in bulk
7.1 How to Access RTE MIS Core Settings
Navigation Steps:
- Click Configuration
- Click RTE MIS Core Settings
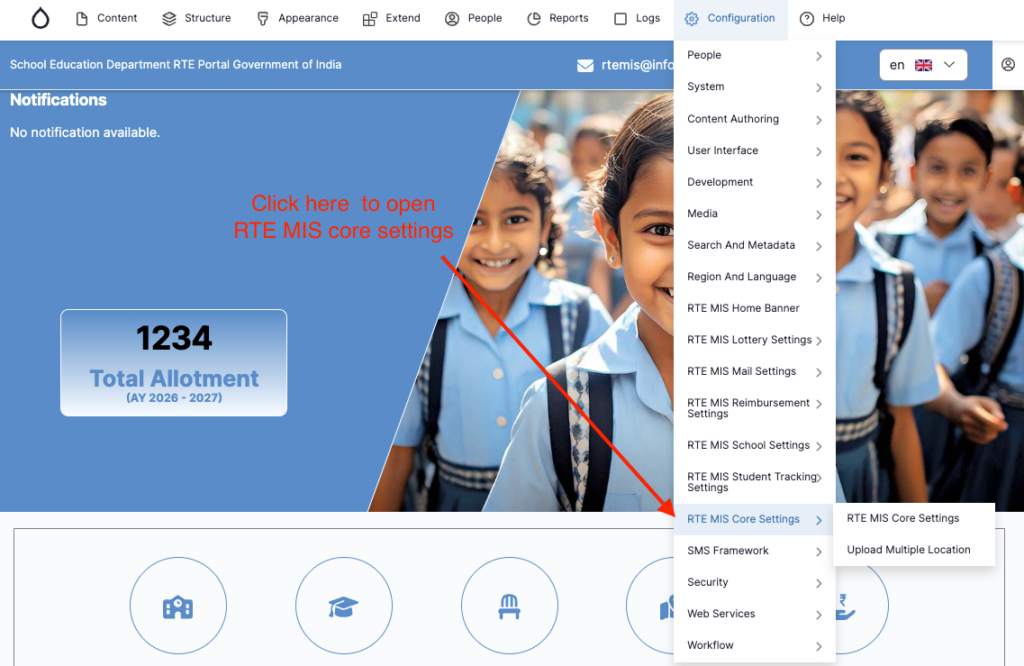
You will see two options:
- RTE MIS Core Settings
- Upload Multiple Location
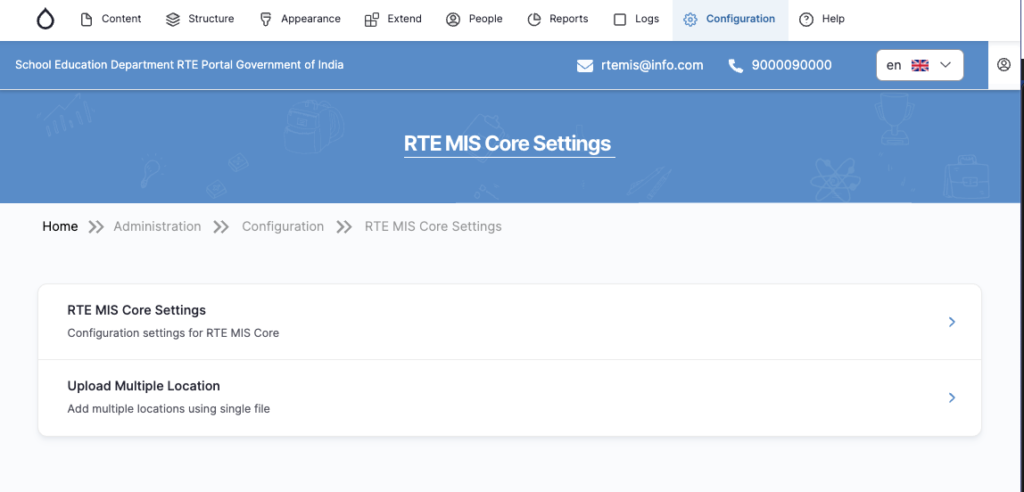
7.2 RTE MIS Core Settings
Click RTE MIS Core Settings to configure system-level settings.
This page contains two main sections:
- Location Settings
- Entry Class Settings
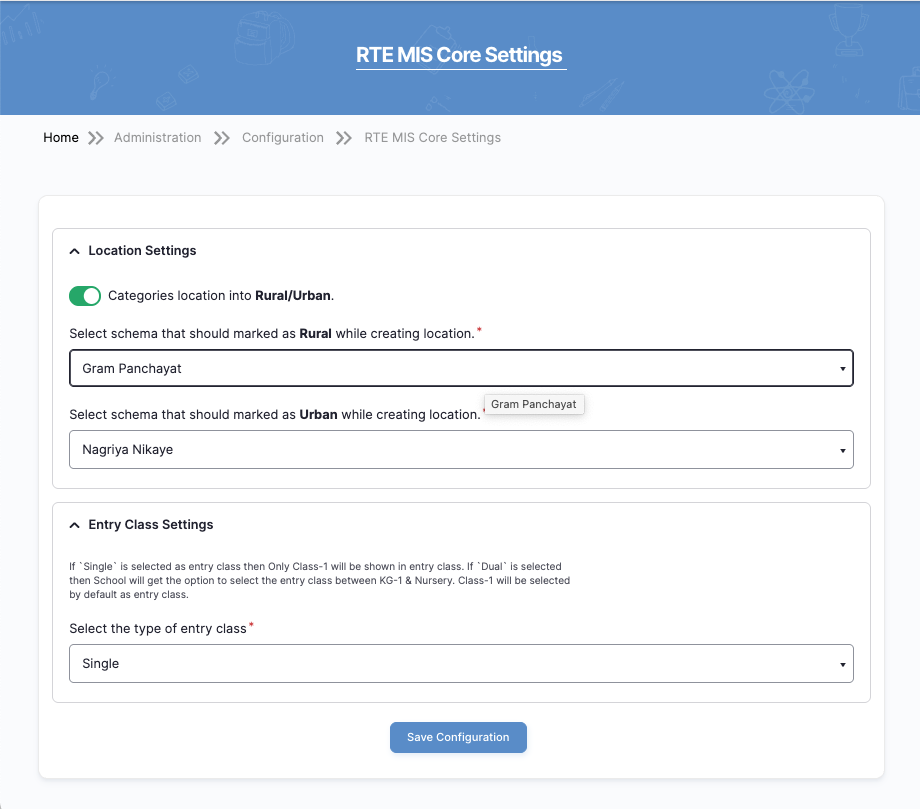
7.2.1 Location Settings (Rural / Urban Classification)
This setting controls how locations are categorized in the system.
Step 1: Enable Rural/Urban Classification
- Ensure the toggle for Categories location into Rural/Urban is turned ON (green).
This ensures every location is marked as either Rural or Urban.
Step 2: Configure Rural Schema
Field:
Select schema that should marked as Rural while creating location
Example:
- Gram Panchayat
Select the appropriate value from the dropdown.
Step 3: Configure Urban Schema
Field:
Select schema that should marked as Urban while creating location
Example:
- Nagriya Nikaye
Select appropriate value from dropdown.
Step 4: Save Settings
Click Save Configuration
⚠️ Important:
Only modify these settings after confirmation from the State authority.
7.2.2 Entry Class Settings
This controls how entry class options appear for schools.
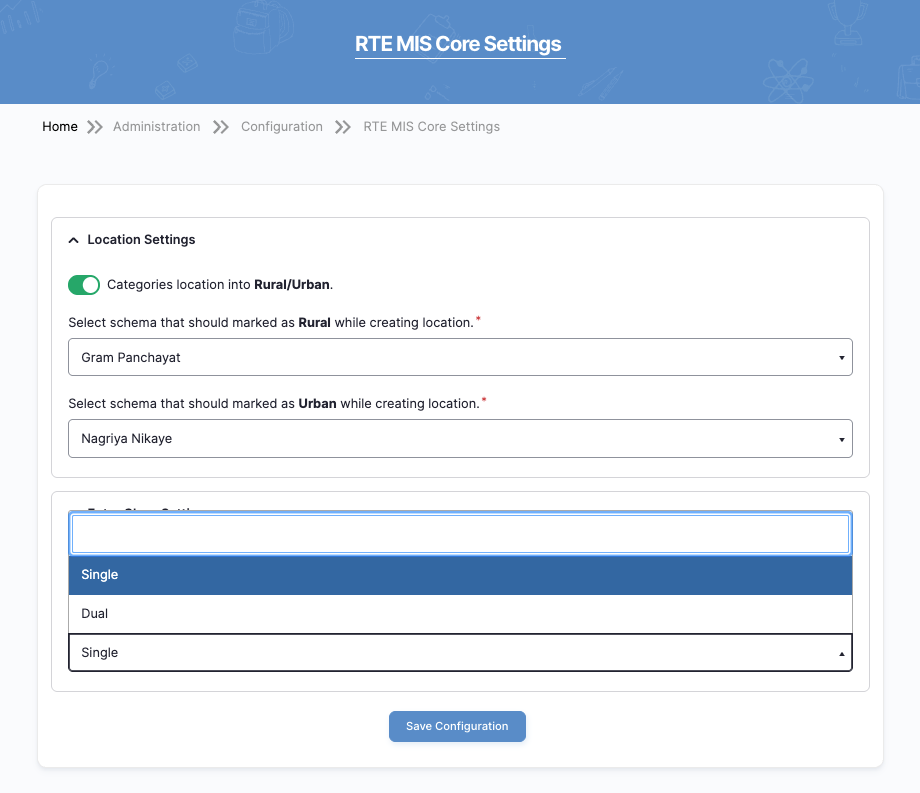
Field:
Select the type of entry class
Options:
1. Single
- Only Class-1 will be available as an entry class.
2. Dual
- Schools can select entry class between:
- KG-1
- Nursery
- Class-1 will be selected by default.
How to Configure
- Click dropdown.
- Select Single or Dual.
- Click Save Configuration.
⚠️ This setting affects admission workflow system-wide.
7.3 Upload Multiple Location (Bulk Upload)
This feature allows uploading multiple locations using a single Excel file.
Use this when:
- First-time system setup
- Adding many districts/blocks
- Bulk correction required
- Data migration
How to Access Bulk Upload Location
- Click Configuration
- Click RTE MIS Core Settings
- Click Upload Multiple Location
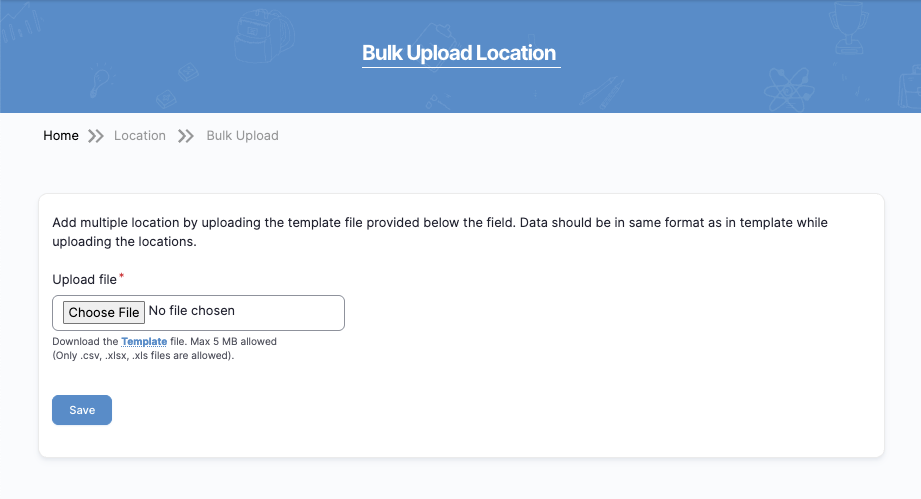
7.3.1 Steps to Upload Locations
Step 1: Download Template
- Click Template
- Save the Excel file
⚠️ Rules:
- Do NOT rename columns
- Use same format as template
- Only first sheet will be processed
- Max file size: 5 MB
- Allowed formats: .csv, .xlsx, .xls
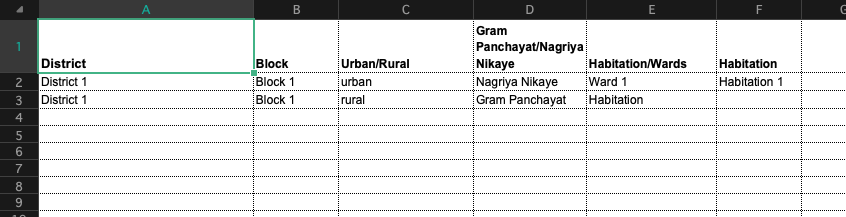
Step 2: Fill Location Data
Open the downloaded file and enter location details carefully.

Required columns include:
- District
- Block
- Urban/Rural
- Gram Panchayat / Nagriya Nikaye
- Habitation/Wards
- Habitation
✔ Ensure:
- Urban/Rural values match system configuration.
- Gram Panchayat is used for Rural.
- Nagriya Nikaye is used for Urban.
- No spelling mistakes.
- No duplicate entries.
- No blank rows between data.
⚠️ Data must follow the exact template format.
Step 3: Save the File
After filling data:
- Save the file as:
- .xlsx
- .xls
- or .csv
- Ensure file size is below 5 MB.
Step 4: Upload the File
- Return to the Bulk Upload Location page.
- Click Choose File.
- Select the completed Excel file.
- Click Save.
7.3.4 Review Upload Status
After clicking Save:
If Successful:
- confirmation message will appear.
- Locations will be added to the system.
If Errors Occur:
- An error message will be displayed.
- Review incorrect rows.
- Correct data in Excel file.
- Re-upload the corrected file.
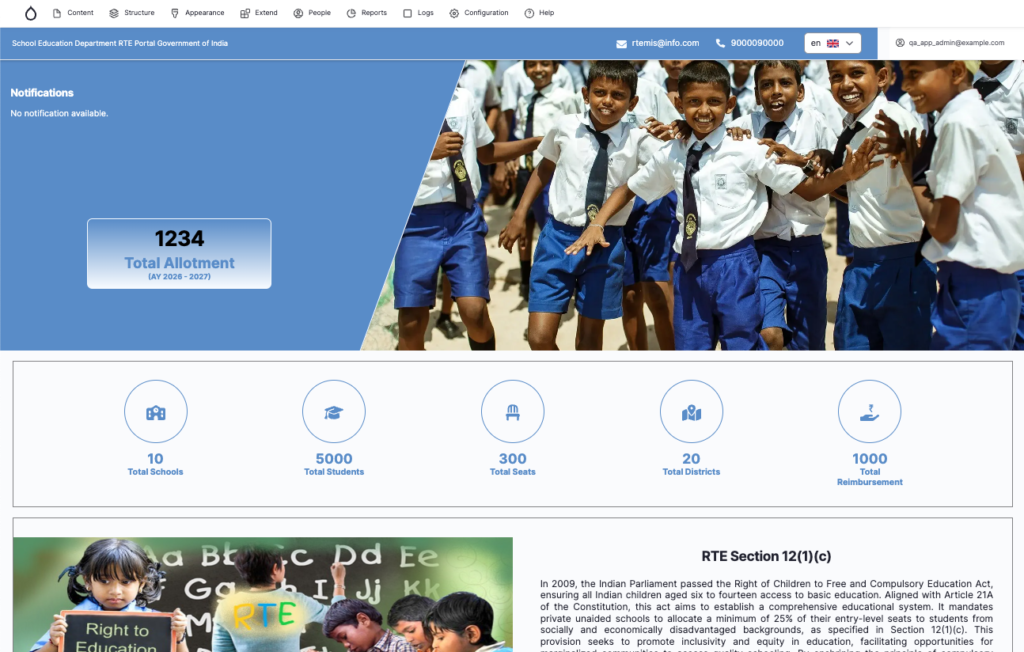
9.Home Page Content update
This section explains how the App Admin can update various sections of the website Home Page, based on the layout shown in the screenshots.
The Home Page includes:
- Notifications Section
- Home Banner Image
- Parent Guide / Video Section
- Our Authorities Section
- Testimonials Section
- News Updates Section
⚠️ Only authorized administrators should modify homepage content.
- Managing Homepage Notifications
This section explains how the App Admin can add, edit, or update Notifications displayed on the Home Page.
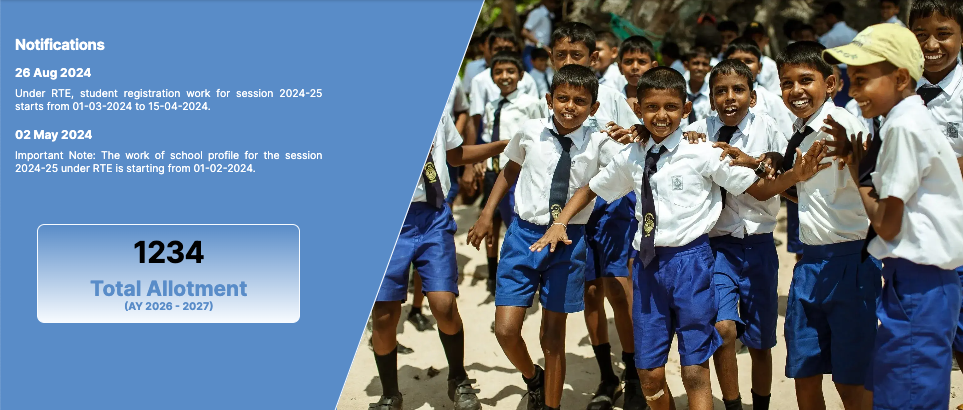
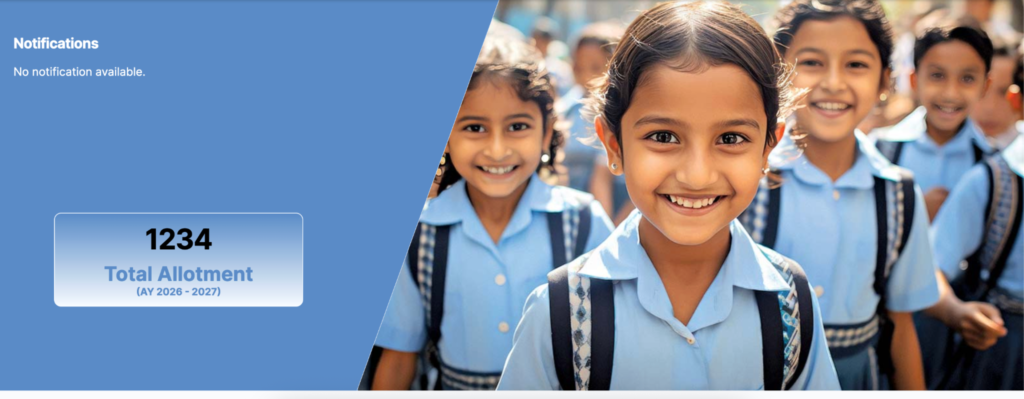
Notifications appear in the top-left section of the homepage with:
- Date
- Message
- Optional link
1.1 How to Access Notification Management
Navigation Steps:
- Click Structure
- Click ECK Entity Types
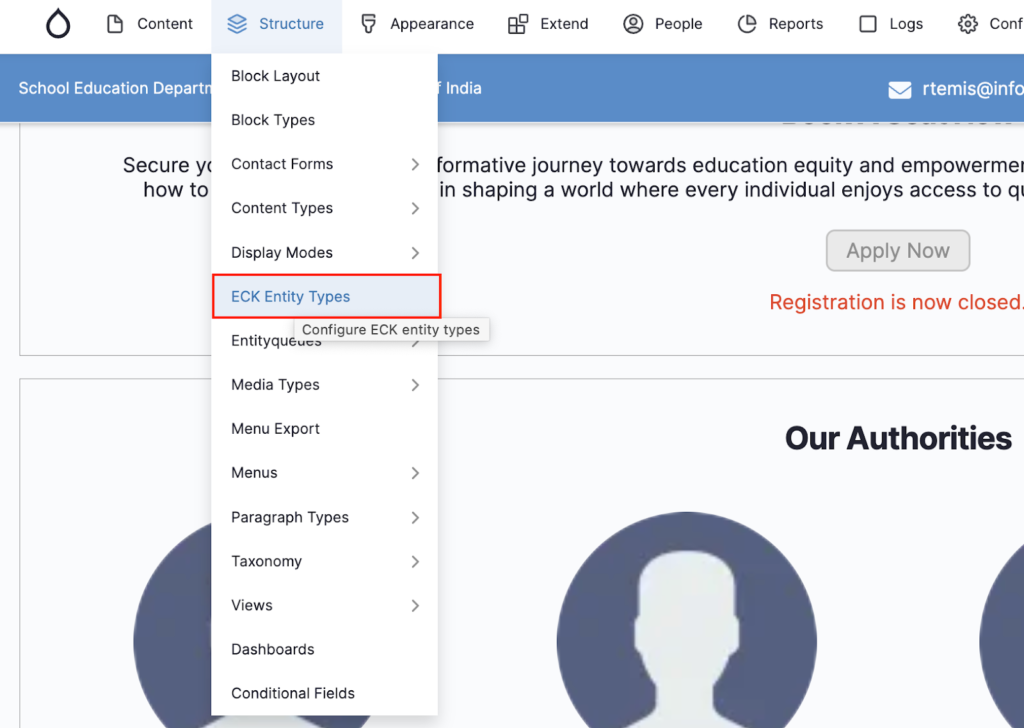
- Locate Mini Node
- Click Add content
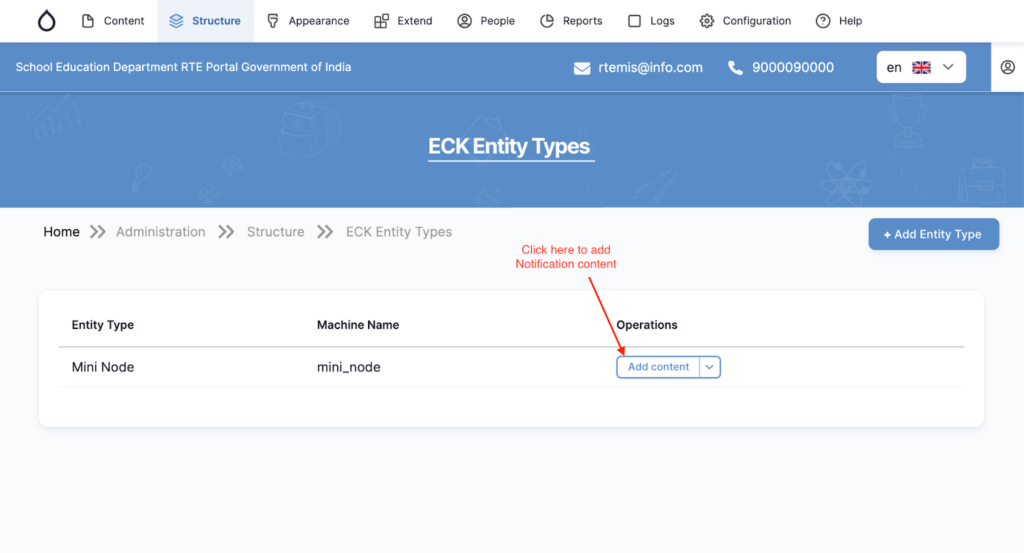
You will be redirected to the content creation page.
1.2 Select Notifications Module
On the “Add Mini Node Content” page:
- Click Notifications

This module is used specifically for homepage notifications.
1.3 Adding a New Notification
You will see the Add Notifications form.
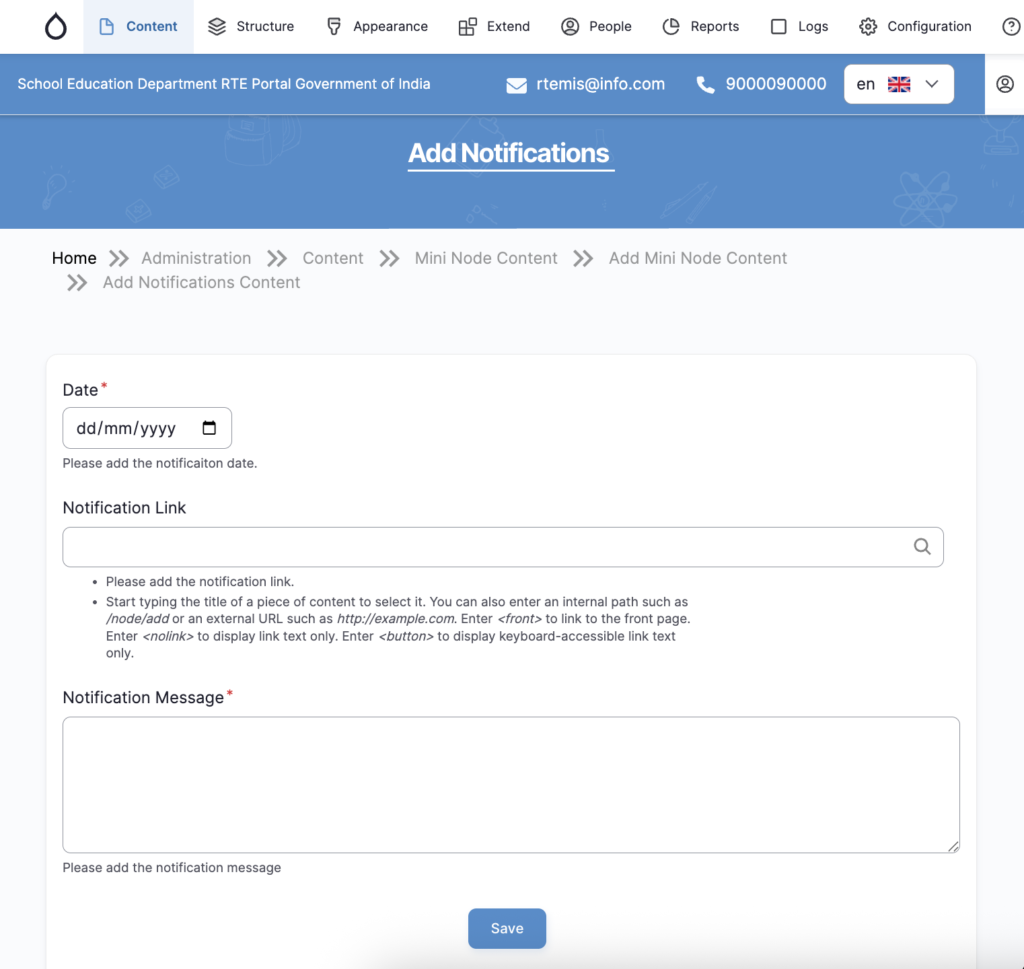
Fill in the following fields:
1️⃣ Date (Required)
- Select the official notification date.
- Use the calendar icon.
- Format: dd/mm/yyyy
Example:
26/08/2024
⚠️ This date will be displayed on the homepage.
2️⃣ Notification Link (Optional but Recommended)
- Add internal page link OR
- Add external URL (if linking to government circular)
You may:
- Start typing internal page title
- Paste full external URL (e.g., https://example.com)
If no link is required, you may leave it blank (if the system allows).
3️⃣ Notification Message (Required)
Enter the official notification text.
Example:
Under RTE, student registration work for session 2024-25 starts from 01-03-2024 to 15-04-2024.
✔ Keep message short and clear
✔ Avoid long paragraphs
✔ Use official government wording
4️⃣ Save Notification
After filling all details:
- Click Save
The notification will now appear on the homepage.
1.4 Removing / Disabling Old Notifications
If a notification is outdated:
Option 1 – Unpublish:
- Edit notification
- Uncheck Published
- Click Save
Option 2 – Delete:
- Click Delete
- Confirm removal
⚠️ Recommended: Unpublish instead of deleting (for record keeping).
1.5 Best Practices for Notifications
✔ Always verify dates before publishing
✔ Do not keep outdated notices active
✔ Keep content simple and clear
✔ Test link after saving
✔ Check homepage after publishing
2. Home Banner Image (Edit Homepage Banner)
This section explains how the App Admin can add, edit, or update homepage banner images displayed on the Home Page.
Steps:
- Click Configuration
- Click RTE MIS Home Banner
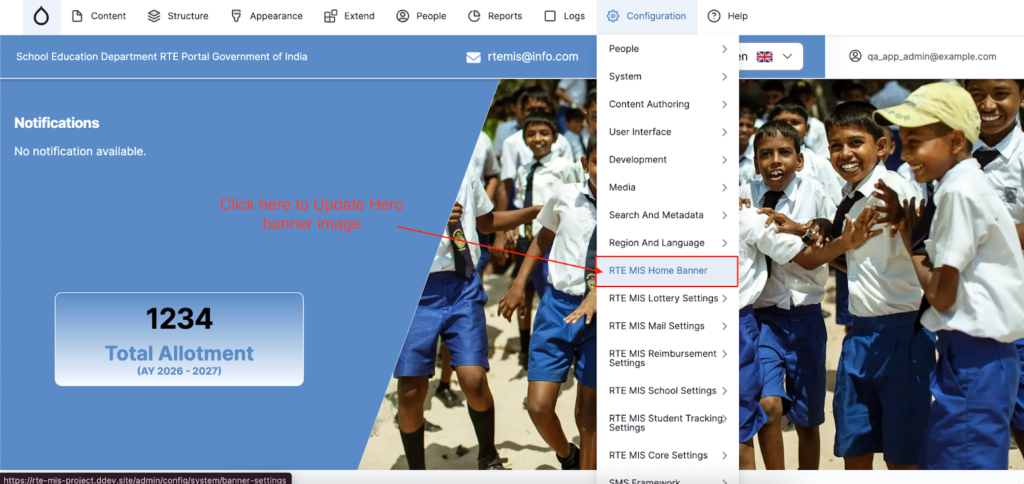
- Upload Banner Image

- Click Save Configuration
Before:
After:

3. Parent Guide / Video Section
This section explains how the App Admin can add or update videos displayed in the Parent Guide / Video Section on the Home Page.
These videos appear as thumbnail cards with a play icon and short description.
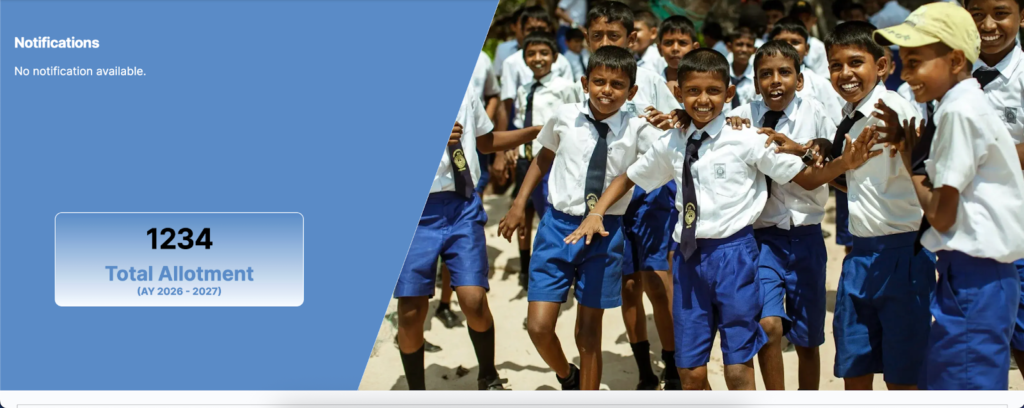
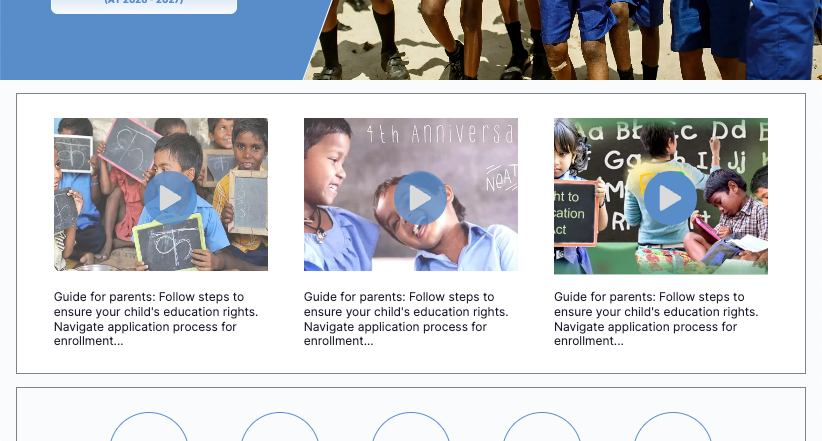
3.1 Where This Section Appears
On the Home Page, below the main banner and statistics, you will see:
- Video thumbnails
- Short guide descriptions
- Play button overlay
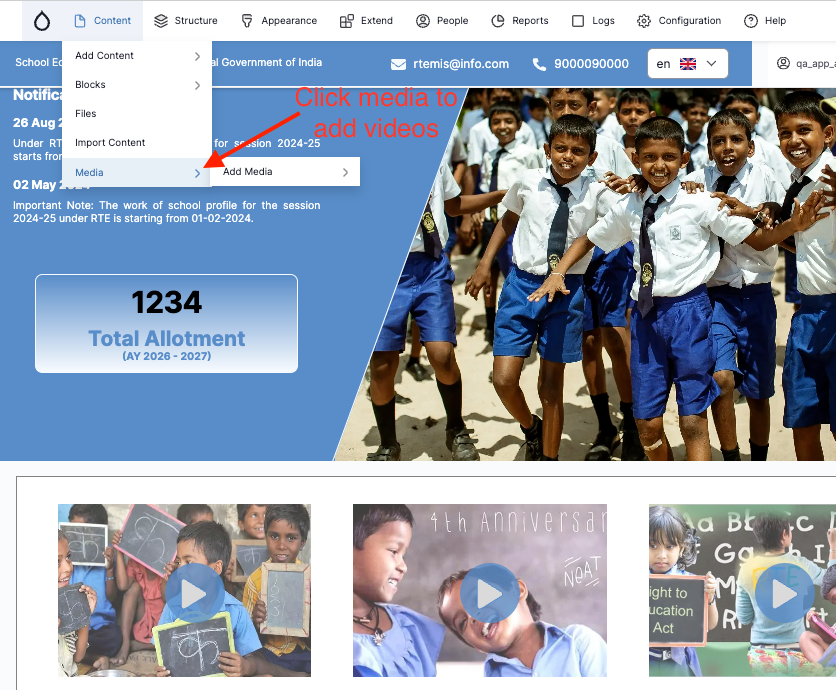
3.2 How to Add a New Video
Navigation Steps:
- Click Content
- Click Media
- Click Add Media
Step 1: Select Video Type
On the Add Media Item page:
- Click Video
This option is specifically used for homepage videos.
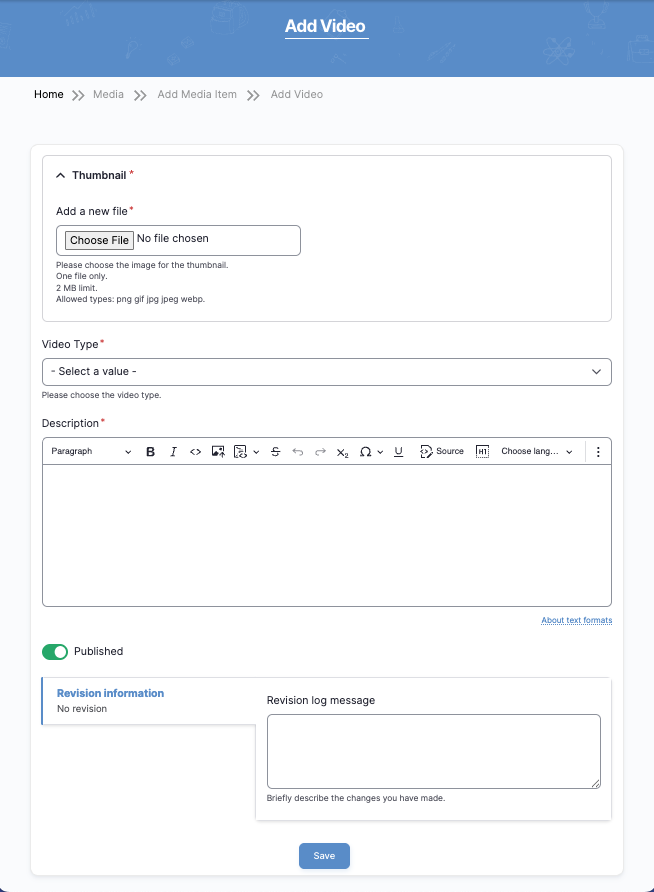
Step 2: Fill Video Details
You will now see the Add Video form.
Fill the following fields:
1️⃣ Thumbnail (Required)
- Click Choose File
- Upload a thumbnail image
Image Requirements:
- Maximum size: 2 MB
- Allowed formats: png, jpg, jpeg, webp
- Use clear, high-quality image
⚠️ Thumbnail will be visible on homepage.
2️⃣ Video Type (Required)
- Select appropriate type from dropdown
- Choose the option used for homepage display
3️⃣ Description (Required)
Enter a short guide description.
Example:
Guide for parents: Follow steps to ensure your child’s education rights. Navigate application process easily.
✔ Keep description short
✔ Avoid long paragraphs
✔ Use simple language
4️⃣ Published (Important)
Ensure the Published toggle is ON (green).
If not published:
- Video will not appear on the homepage.
5️⃣ Revision Information (Optional)
You may enter a short message describing what was updated.
Example:
Added new Parent Guide video for 2026 session.
Step 3: Save the Video
Click Save
After saving:
- Video will be available in the media library.
- It will automatically display in the homepage video section (if configured).
3.3 Editing an Existing Video
To update a video:
- Click Content
- Click Media
- Search for the video
- Click Edit
- Update:
- Thumbnail
- Description
- Video type
- Click Save
3.4 Removing a Video
Option 1 – Unpublish (Recommended):
- Edit video
- Turn OFF Published
- Click Save
Option 2 – Delete:
- Click Delete
- Confirm removal
⚠️ Recommended: Unpublish instead of deleting for record keeping.
3.5 Best Practices
✔ Use official and approved video content only
✔ Keep thumbnail professional and clear
✔ Test video playback after saving
✔ Ensure video loads properly on mobile
✔ Avoid uploading very large files
4. Our Authorities Section
This section explains how the App Admin can add or update the Our Authorities section displayed on the Home Page.
The section displays:
- Authority Photo
- Authority Name
- Position / Designation
Example positions shown on the homepage:
- Deputy Chief Minister
- Minister of Education
- Chief Minister
4.1 Where This Section Appears
On the Home Page, the Our Authorities section shows a list of important government officials with their images and designations.

4.2 How to Add a New Authority
Navigation Steps
- Click Content
- Click Add Content
- Select Authority
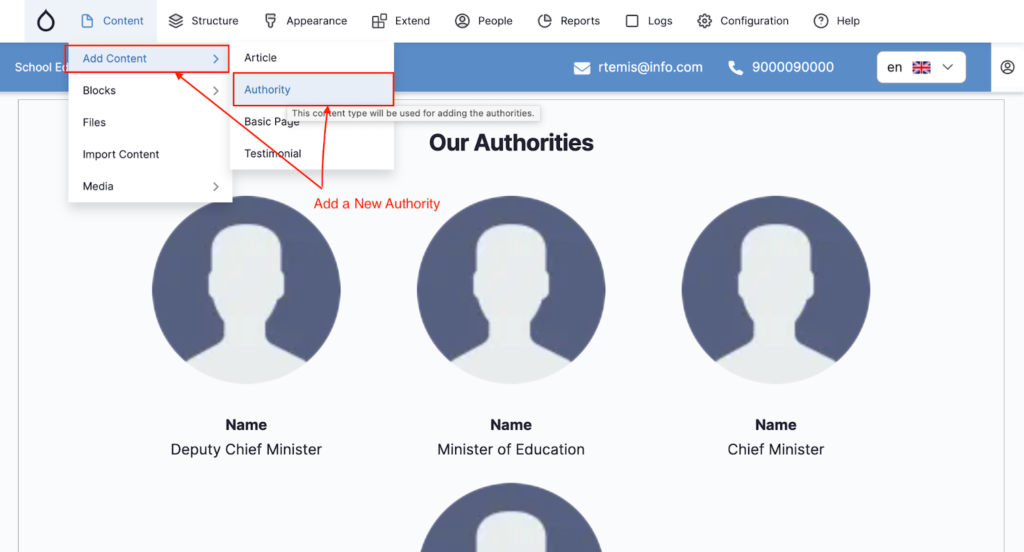
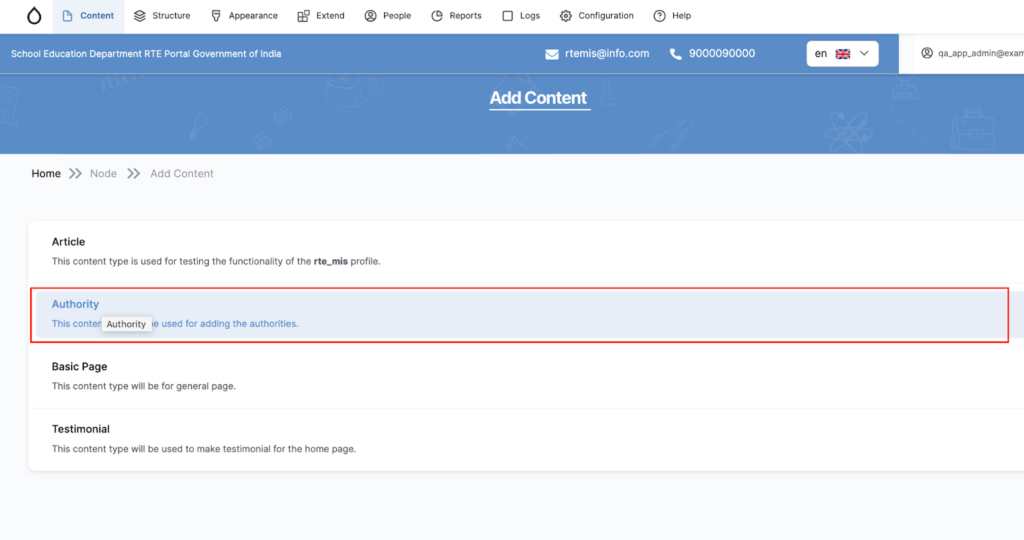
You will be redirected to the Create Authority page.
4.3 Fill Authority Details
You will see the Create Authority form.
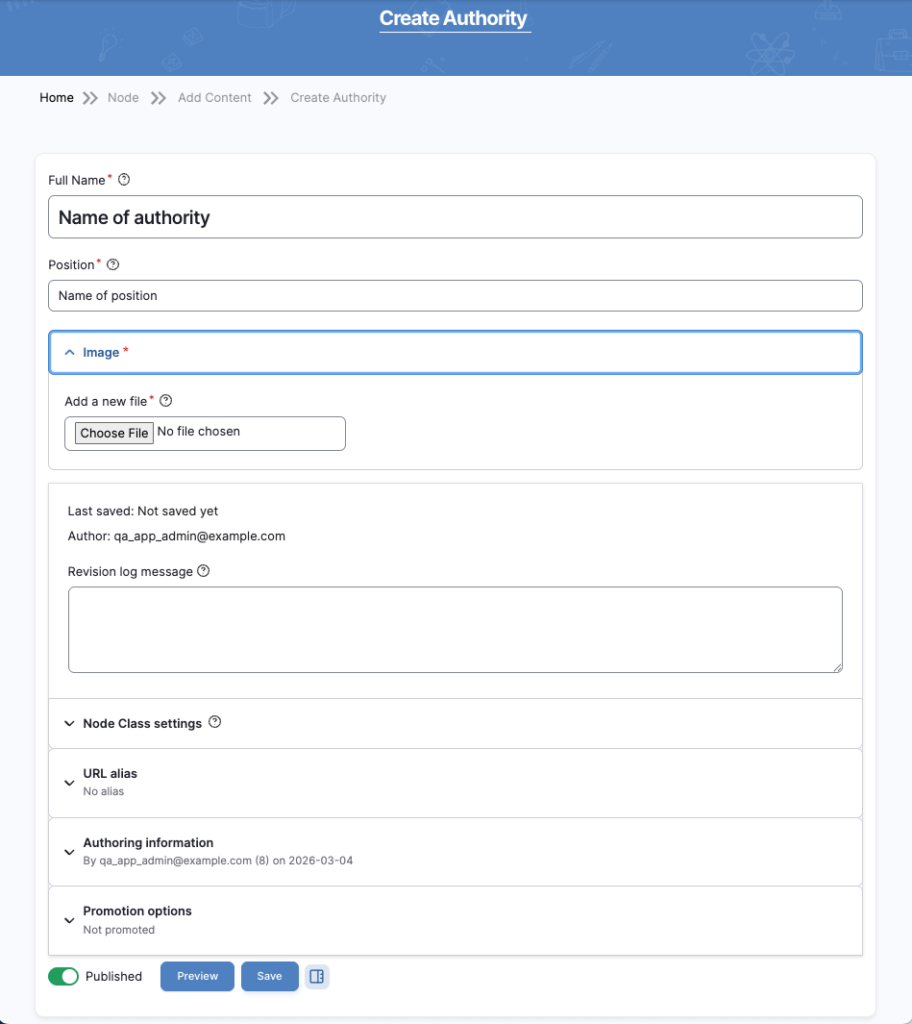
Fill the following fields:
1️⃣ Full Name (Required)
Enter the name of the authority.
Example: Shri Rajesh Sharma
2️⃣ Position (Required)
Enter the designation of the authority.
Example:
Chief Minister
Minister of Education
Deputy Chief Minister
3️⃣ Image (Required)
Upload the authority’s official photograph.
Steps:
- Click Choose File
- Upload the image
Recommended image guidelines:
- Clear official portrait
- Square format preferred
- High resolution
- Government-approved photo
4️⃣ Published
Ensure the Published toggle is ON.
If not enabled:
- Authority will not appear on the homepage.
5️⃣ Revision Log (Optional)
Enter a note if you are updating the record.
Example: Added a new Education Minister.
4.4 Save Authority
After filling the details:
- Click Save
The authority will now appear in the Our Authorities section on the homepage.
4.5 Edit an Existing Authority
To update authority information:
- Click Content
- Search for Authority
- Click Edit
- Update:
- Name
- Position
- Image
- Click Save
4.6 Remove an Authority
Option 1 (Recommended): Unpublish
- Edit the authority
- Turn OFF Published
- Click Save
Option 2: Delete
- Click Delete
- Confirm removal
4.7 Best Practices
✔ Use official government photos only
✔ Ensure correct spelling of names
✔ Verify designation titles
✔ Keep images clear and professional
✔ Avoid duplicate entries
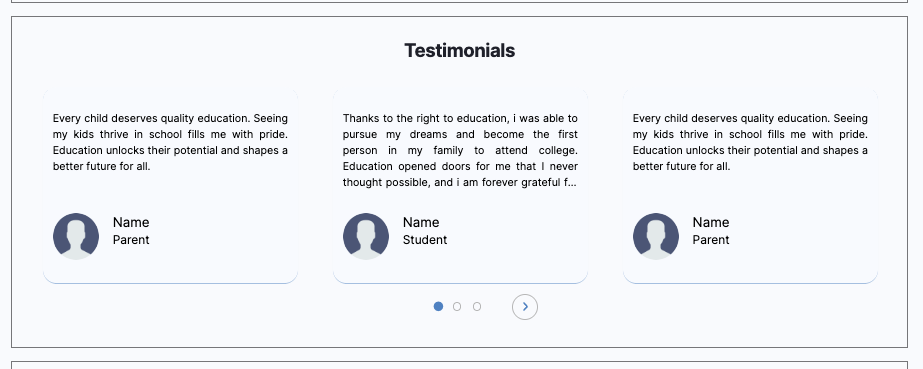
5. Testimonials Section (Homepage)
This section explains how the App Admin can add and manage Testimonials displayed on the Home Page.
Testimonials show feedback from:
- Students
- Parents
- Teachers
Each testimonial contains:
- Full Name
- Person Image
- Position (Student / Parent / Teacher)
- Feedback Message
5.1 Where This Section Appears
On the Home Page, the Testimonials section displays feedback cards in a slider format.
Users can view multiple testimonials using the slider controls.
5.2 How to Add a New Testimonial
Navigation Steps
- Click Content
- Click Add Content
- Select Testimonial

You will be redirected to the Create Testimonial page.
5.3 Fill Testimonial Details
On the Create Testimonial page, fill the following fields.
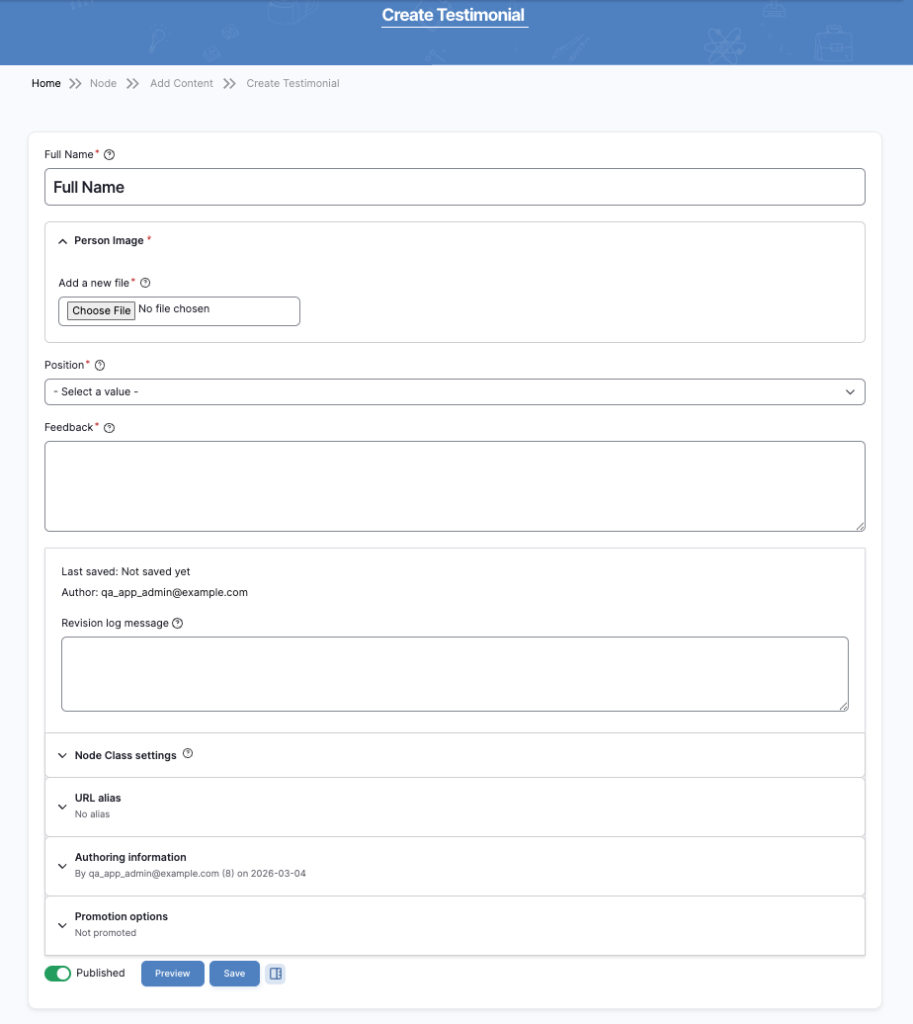
1. Full Name (Required)
Enter the name of the person giving the testimonial.
Example:
Rahul Sharma
Priya Verma
2. Person Image (Required)
Upload the photograph of the person.
Steps:
- Click Choose File
- Select the image from your computer
- Upload the file
Recommended image guidelines:
- Clear portrait image
- Square format preferred
- Small file size for faster loading
3. Position (Required)
Select the category of the person from the dropdown.
Available options:
- Student
- Parent
- Teacher
This label will appear below the name on the testimonial card.
4. Feedback (Required)
Enter the testimonial message describing their experience with the system.
Example:
“Thanks to the Right to Education initiative, my child was able to access quality education. This program has created new opportunities for our family.”
Tips:
- Keep the message short and meaningful
- Avoid very long paragraphs
5. Published
Ensure the Published toggle is enabled.
If it is disabled, the testimonial will not appear on the homepage.
5.4 Save the Testimonial
After filling all required fields:
- Click Save
The testimonial will now appear in the Testimonials section on the homepage.
5.5 Edit an Existing Testimonial
To update testimonial information:
- Click Content
- Search for Testimonial
- Click Edit
- Update the required details
- Click Save
5.6 Remove a Testimonial
Option 1 — Unpublish (Recommended)
- Edit the testimonial
- Turn OFF Published
- Click Save
Option 2 — Delete
- Click Delete
- Confirm the deletion
5.7 Best Practices
✔ Use genuine testimonials from verified users
✔ Keep feedback concise and clear
✔ Ensure images are professional and clear
✔ Avoid duplicate entries
✔ Regularly review and update testimonials
6. News Updates Section (Homepage)
This section explains how the App Admin can add and manage News Updates displayed on the Home Page.
The News Updates section highlights important announcements or updates using images displayed in a slider format.
Each news item contains:
- News Image
- Publish Status
These updates appear as image cards in the News Updates slider on the homepage.
6.1 Where This Section Appears
On the Home Page, the News Updates section displays multiple news images in a carousel/slider layout.
Users can browse through multiple news items using the slider navigation controls.

6.2 How to Add a News Update
Navigation Steps
- Click Content
- Click Media
- Click Add Media
- Select News Update
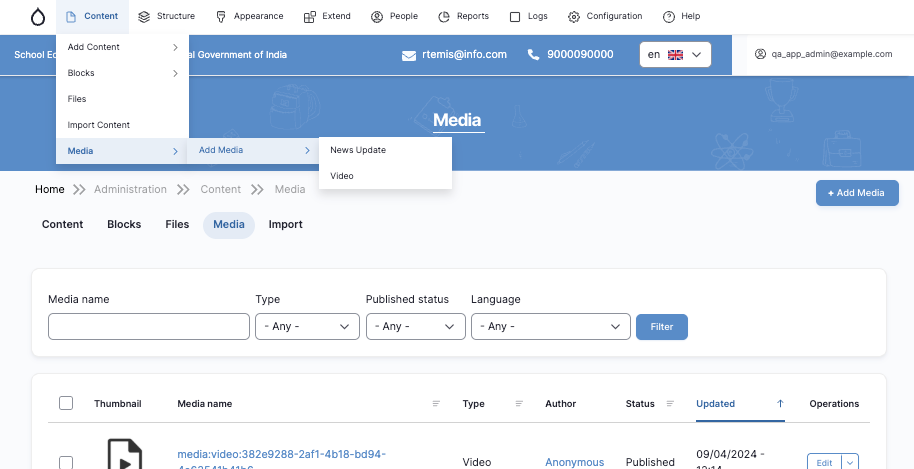
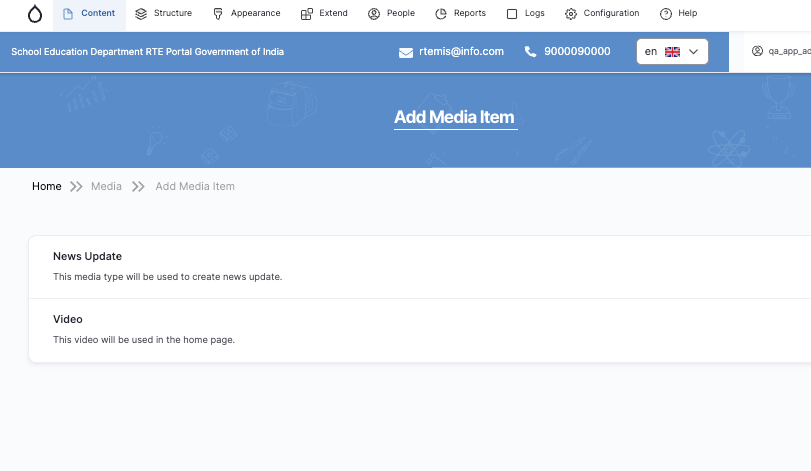
You will be redirected to the Add News Update page.
On the Add News Update page, fill in the required information.
6.3 Upload News Image
Image (Required)
Upload the image representing the news update.
Steps:
- Click Choose File
- Select the image from your computer
- Upload the file
Image Requirements
- Only one image file allowed
- Maximum file size: 2 MB
- Allowed formats:
- PNG
- GIF
- JPG
- JPEG
- WEBP
Use a clear image related to the news or announcement.
6.4 Publish the News Update
Ensure the Published toggle is enabled.
If disabled:
- The news item will not appear on the homepage.
6.5 Save the News Update
After uploading the image:
- Click Save
The news item will now appear in the News Updates section on the homepage.
6.6 Edit a News Update
To update an existing news item:
- Click Content
- Click Media
- Locate the News Update
- Click Edit
- Update the image if needed
- Click Save
6.7 Remove a News Update
Option 1 — Unpublish (Recommended)
- Edit the news item
- Turn OFF Published
- Click Save
Option 2 — Delete
- Click Delete
- Confirm deletion
6.8 Best Practices
✔ Use clear and high-quality images
✔ Keep image sizes optimized
✔ Ensure images represent actual announcements
✔ Remove outdated news items
✔ Avoid duplicate uploads